Fast, Frictionless, and Secure: Explore our 120+ Connectors Portfolio | Join Webinar!
Getting Started with Protobuf in Confluent Cloud
Get started with Confluent, for free
Watch demo: Kafka streaming in 10 minutes
Confluent Cloud supports Schema Registry as a fully managed service that allows you to easily manage schemas used across topics, with Apache Kafka® as a central nervous system that connects disparate applications. Today, I am happy to share that the managed Schema Registry in Confluent Cloud now supports both Protobuf and JSON Schemas, in addition to Apache Avro™.
Support for Protobuf and JSON Schemas was first introduced in Confluent Platform, and Confluent Cloud always ships the latest features from Confluent Platform to ensure the same developer experience for both on-premises and cloud deployments.
This post explains how to get started with Protobuf support, showing all aspects of developing applications using Protobuf with Confluent Cloud.
Enabling Schema Registry
The first step to using Schema Registry in Confluent Cloud is to enable it in the environment that contains your Kafka clusters. Environments are logical abstractions that allow you to group your clusters in a more cohesive way. Each environment may have an optional managed Schema Registry that can be shared among all the clusters for that environment. Since it is optional, it is up to you to enable it in the environment.
Luckily, enabling a managed Schema Registry is straightforward. Within your cluster, you can simply click Schemas on the navigation bar, as shown in Figure 1.
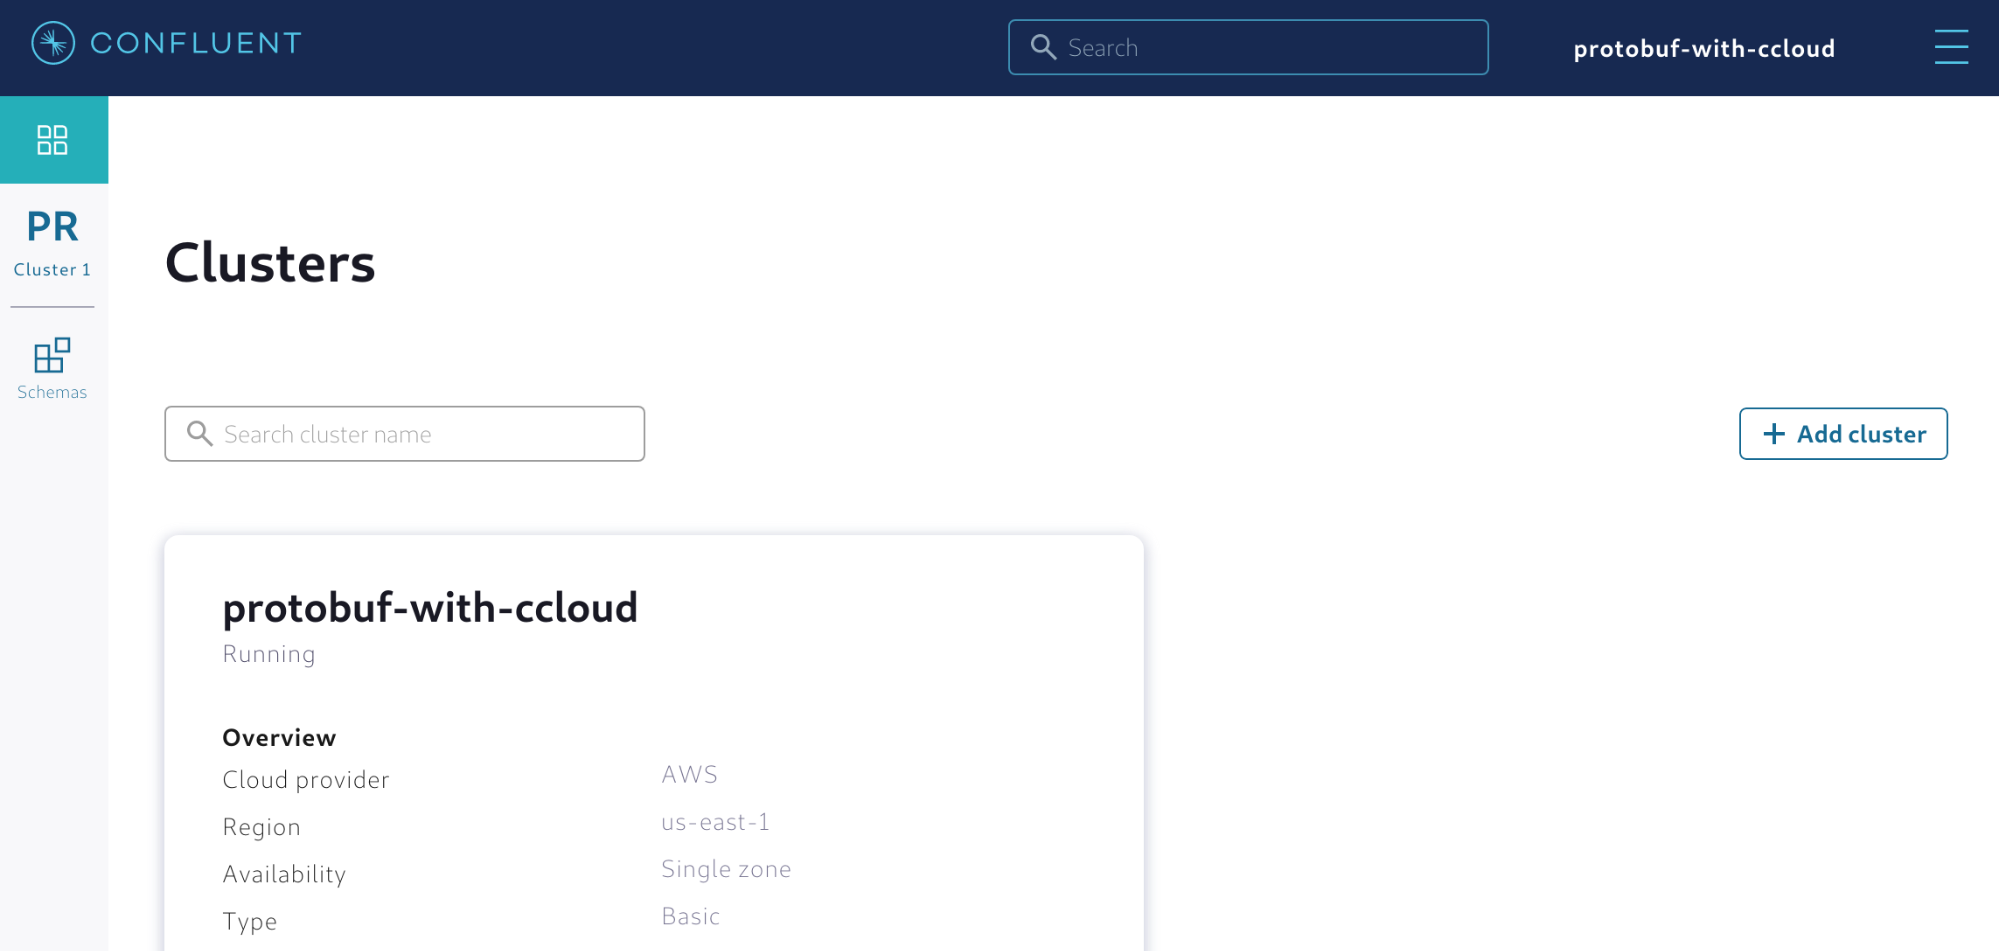 Figure 1. Enabling a managed Schema Registry in Confluent Cloud
After clicking Schemas, you will see the configuration needed to enable the managed Schema Registry. You must specify which cloud provider will run the software and in which region. It is important to note that the region should be as close as possible to the applications that will write and read records to and from Kafka. Figure 2 shows an example of what is displayed.
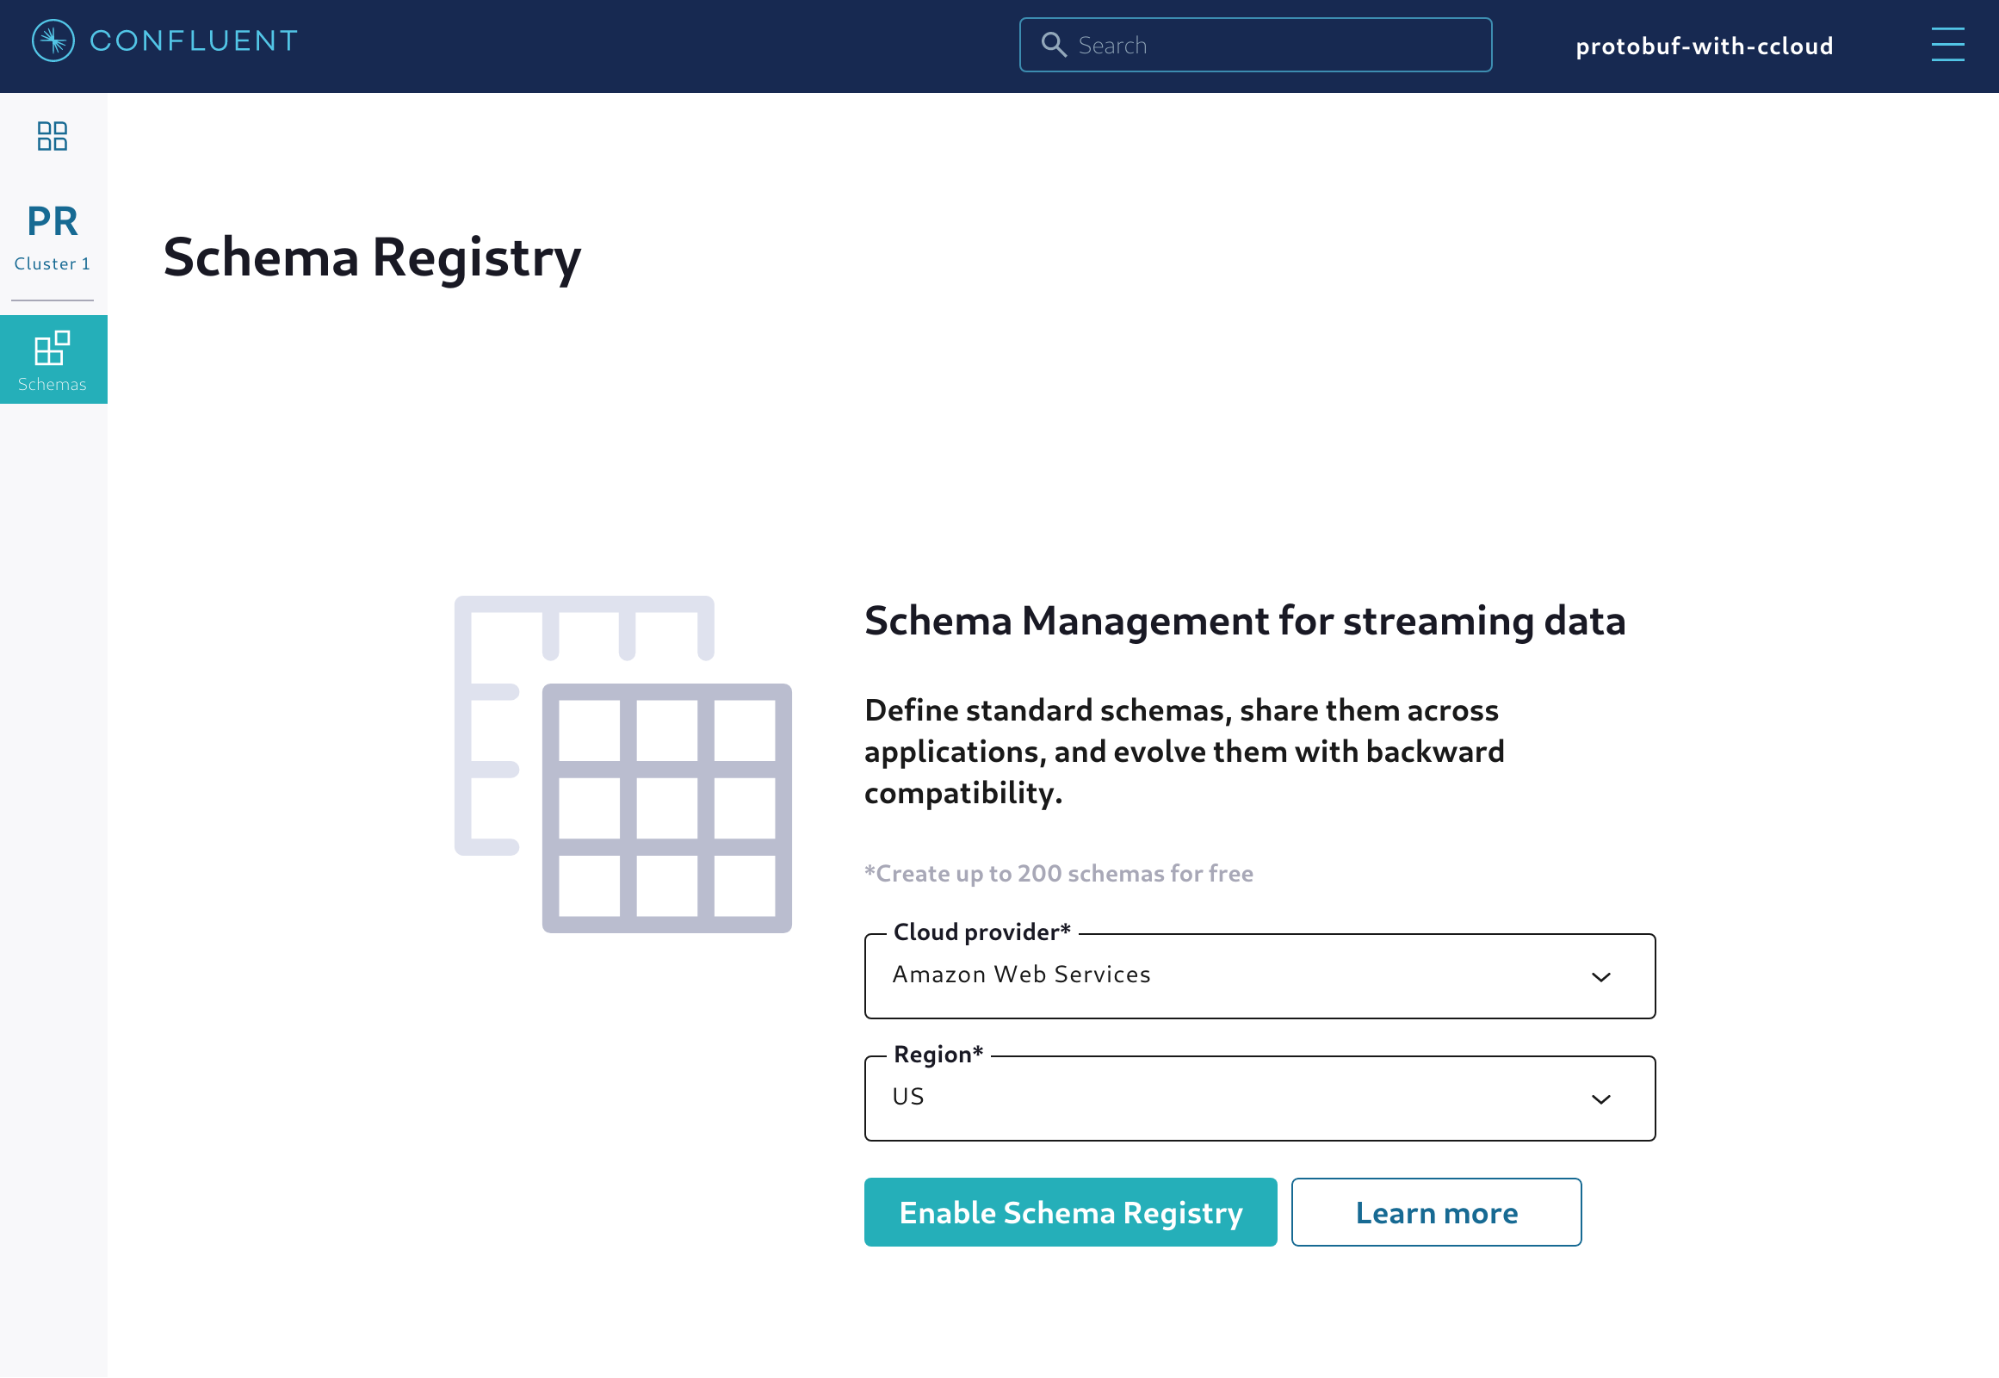 Figure 2. Choosing the cloud provider and region for the managed Schema Registry
Click Enable Schema Registry and confirm the creation. Congratulations! You now have a managed Schema Registry enabled for the environment, and all the clusters within that environment will point to this Schema Registry by default.
Alternatively, you can also enable the managed Schema Registry using the Confluent Cloud CLI. In order to do that, first make sure that the environment is selected and contains at least one cluster. Then execute the following command:
ccloud schema-registry cluster enable --cloud <CLOUD_PROVIDER> --geo <REGION>
Generating the client configuration
Now we need to create the client configuration that the applications will use to connect to Confluent Cloud. This is a set of properties that tells Kafka producers and consumers how to interact with the cluster. Though you can always write these properties yourself, Confluent Cloud makes it easy and provides the tools to generate the client configuration automatically.
In the Confluent Cloud UI, select your cluster from the navigation bar and click the Tools & client configuration menu. Then, click on Clients to display the list of suggestions for different programming languages, as shown in Figure 3.
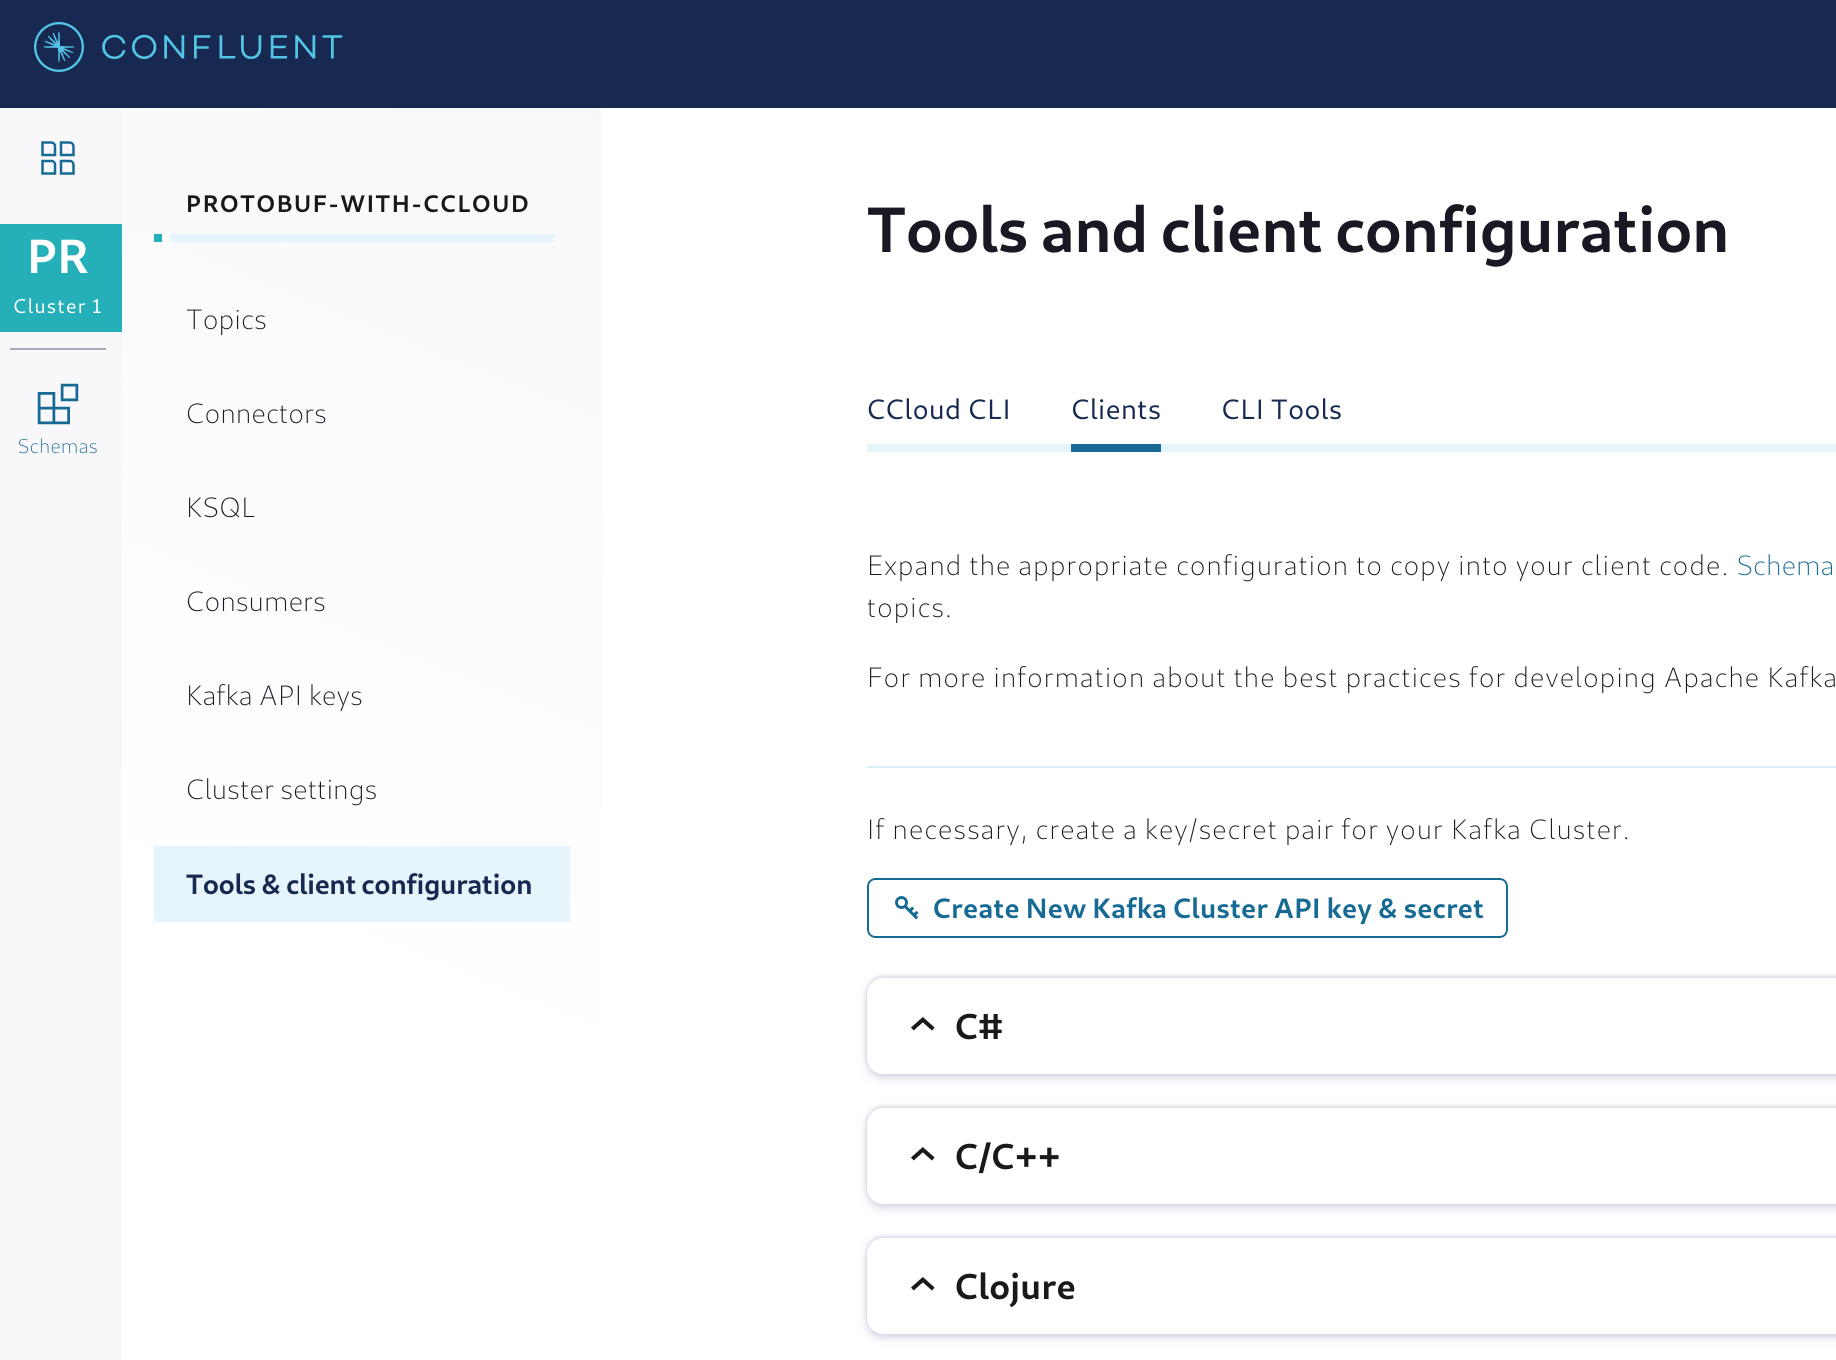 Figure 3. Generating the client configuration for the applications
Before selecting the programming language, click Create New Kafka Cluster API key & secret to generate an API key and secret that will be used to handle authentication. Kafka clients interacting with Confluent Cloud clusters need to authenticate before they can start writing and/or reading any data.
With the cluster API key and secret generated, select Java as the programming language of choice. You will see that within the client configuration properties, the API key and secret will be set, as shown in Figure 4.
You may also notice that the property schema.registry.url will also be set and will point to a URL. This URL represents the endpoint of the managed Schema Registry that you enabled before.
The last action item is to generate an API key and secret for the managed Schema Registry. Like Kafka clusters, Schema Registry also expects clients to authenticate themselves before being able to issue any request to the service. To generate an API key and secret, use Create New Schema Registry API key & secret, as described above.
 Figure 4. Client configuration ready to be copied to the application
You now have a client configuration that is ready to be copied. Simply click Copy to clipboard to have a copy of the client configuration available, and save this client configuration in a file named ccloud.properties. We will leverage this file in the following sections.
Sensor readings using Protobuf
There’s no better way to test the support for Protobuf in Confluent Cloud than to write some Protobuf code and generate the client code to use with an application. To illustrate this, we will use sample sensor data containing temperature readings. A device will be defined, and it will contain a unique identifier and a Boolean field that indicates if the device is enabled or not. The sensor readings will contain a reference to a device, an Int64 field that contains a timestamp of when the reading was taken, as well as a Double field that contains the reading.
In Protobuf, we can define this data model using messages. The code below shows how this data model is defined using Protobuf:
syntax = "proto3";
package io.confluent.cloud.demo.domain;
option java_outer_classname = "SensorReadingImpl";

message SensorReading {
   message Device {
      string deviceID = 1;
      bool enabled = 2;
   }

   Device device = 1;
   int64 dateTime = 2;
   double reading = 3;
}
The option java_outer_classname indicates the name of the Java class that will contain the implementation of both Device and SensorReading messages. In order to generate this class, we need to use a Protobuf compiler. Since we are using Java for this example, we can use a Maven plugin called protoc-jar-maven-plugin that automates the generation of the client code.
Assuming that the Protobuf definition is created in a file named sensorReading.proto and stored in the folder src/main/resources, you can use the Maven plugin as shown below:
<plugin>
  <groupId>com.github.os72</groupId>
  <artifactId>protoc-jar-maven-plugin</artifactId>
  <version>3.11.4</version>
  <executions>
    <execution>
      <phase>generate-sources</phase>
      <goals>
        <goal>run</goal>
      </goals>
      <configuration>
        <inputDirectories>
          <include>src/main/resources/</include>
        </inputDirectories>
        <outputTargets>
          <outputTarget>
            <type>java</type>
            <addSources>none</addSources>
            <outputDirectory>src/main/java/</outputDirectory>
          </outputTarget>
        </outputTargets>
      </configuration>
    </execution>
  </executions>
</plugin>
If you invoke the Maven compile phase on your project, then the plugin will compile the Protobuf file and generate a file named SensorReadingImpl.java in the folder src/main/java. In this file, there will be Device and SensorReading messages that you need to start implementing on your producers and consumers, which is going to be covered in the next sections.
Writing a Kafka producer application
Now that you have the client code, you need to generate data compatible with Protobuf. It is time to implement a producer application that will create sensor readings and write to a Kafka topic named SensorReading.
The very first thing that the producer application needs to do is load the client configuration from the file ccloud.properties that was created earlier. To make testing easier, have the file available in the application classpath and load its contents during the application bootstrap, as shown in the example below:
private static Properties configs = new Properties();

static {
    try {
        try (InputStream is = KafkaUtils.class.getResourceAsStream("/ccloud.properties")) {
            configs.load(is);
        }
    } catch (IOException ioe) {
    }
}

public static Properties getConfigs() {
    return configs;
}
As a result, any piece of code can simply call the method getConfigs() to obtain a copy of the client configuration needed to establish a connection to Confluent Cloud. The producer code also needs to establish the serialization strategy it will use for keys and values. The key itself will be a simple string with the device ID, but the value will be an instance of the SensorReading class. Therefore, we need to configure the producer to be able to serialize this class appropriately, as well as to register the Protobuf schema with the managed Schema Registry.
In order to do this, you need to append the client configuration with the serialization strategy:
// Load from the 'ccloud.properties'
Properties configs = getConfigs();

// Append the serialization strategy
configs.setProperty(ProducerConfig.KEY_SERIALIZER_CLASS_CONFIG,
   org.apache.kafka.common.serialization.StringSerializer.class.getName());
configs.setProperty(ProducerConfig.VALUE_SERIALIZER_CLASS_CONFIG,
   io.confluent.kafka.serializers.protobuf.KafkaProtobufSerializer.class.getName());
With the serialization strategy in place, you can implement the code that creates sensor readings and write them in a Kafka topic:
try (KafkaProducer<String, SensorReading> producer = new KafkaProducer<>(configs)) {
   Device device = DEVICES.get(index);
   String recordKey = device.getDeviceID();
   ProducerRecord<String, SensorReading> record =
      new ProducerRecord<>("SensorReading", recordKey,
         SensorReading.newBuilder()
            .setDevice(device)
            .setDateTime(new Date().getTime())
            .setReading(RANDOM.nextDouble())
            .build());
   producer.send(record, (metadata, exception) -> {
      System.out.println(String.format(
         "Reading sent to partition %d with offset %d",
         metadata.partition(), metadata.offset()));
   });
}
The code shown above creates a producer based on the client configuration. The code assumes a list of devices stored that will be reused throughout the entire application lifecycle. A new record is created, and its value is a new instance of a sensor reading, which is associated with the device and has some random values set. The record is then sent to a topic named SensorReadingthat should have been created prior to the execution of this code.
When the first record is written into Kafka, the Protobuf schema will be automatically registered in the managed Schema Registry, as shown in Figure 5.
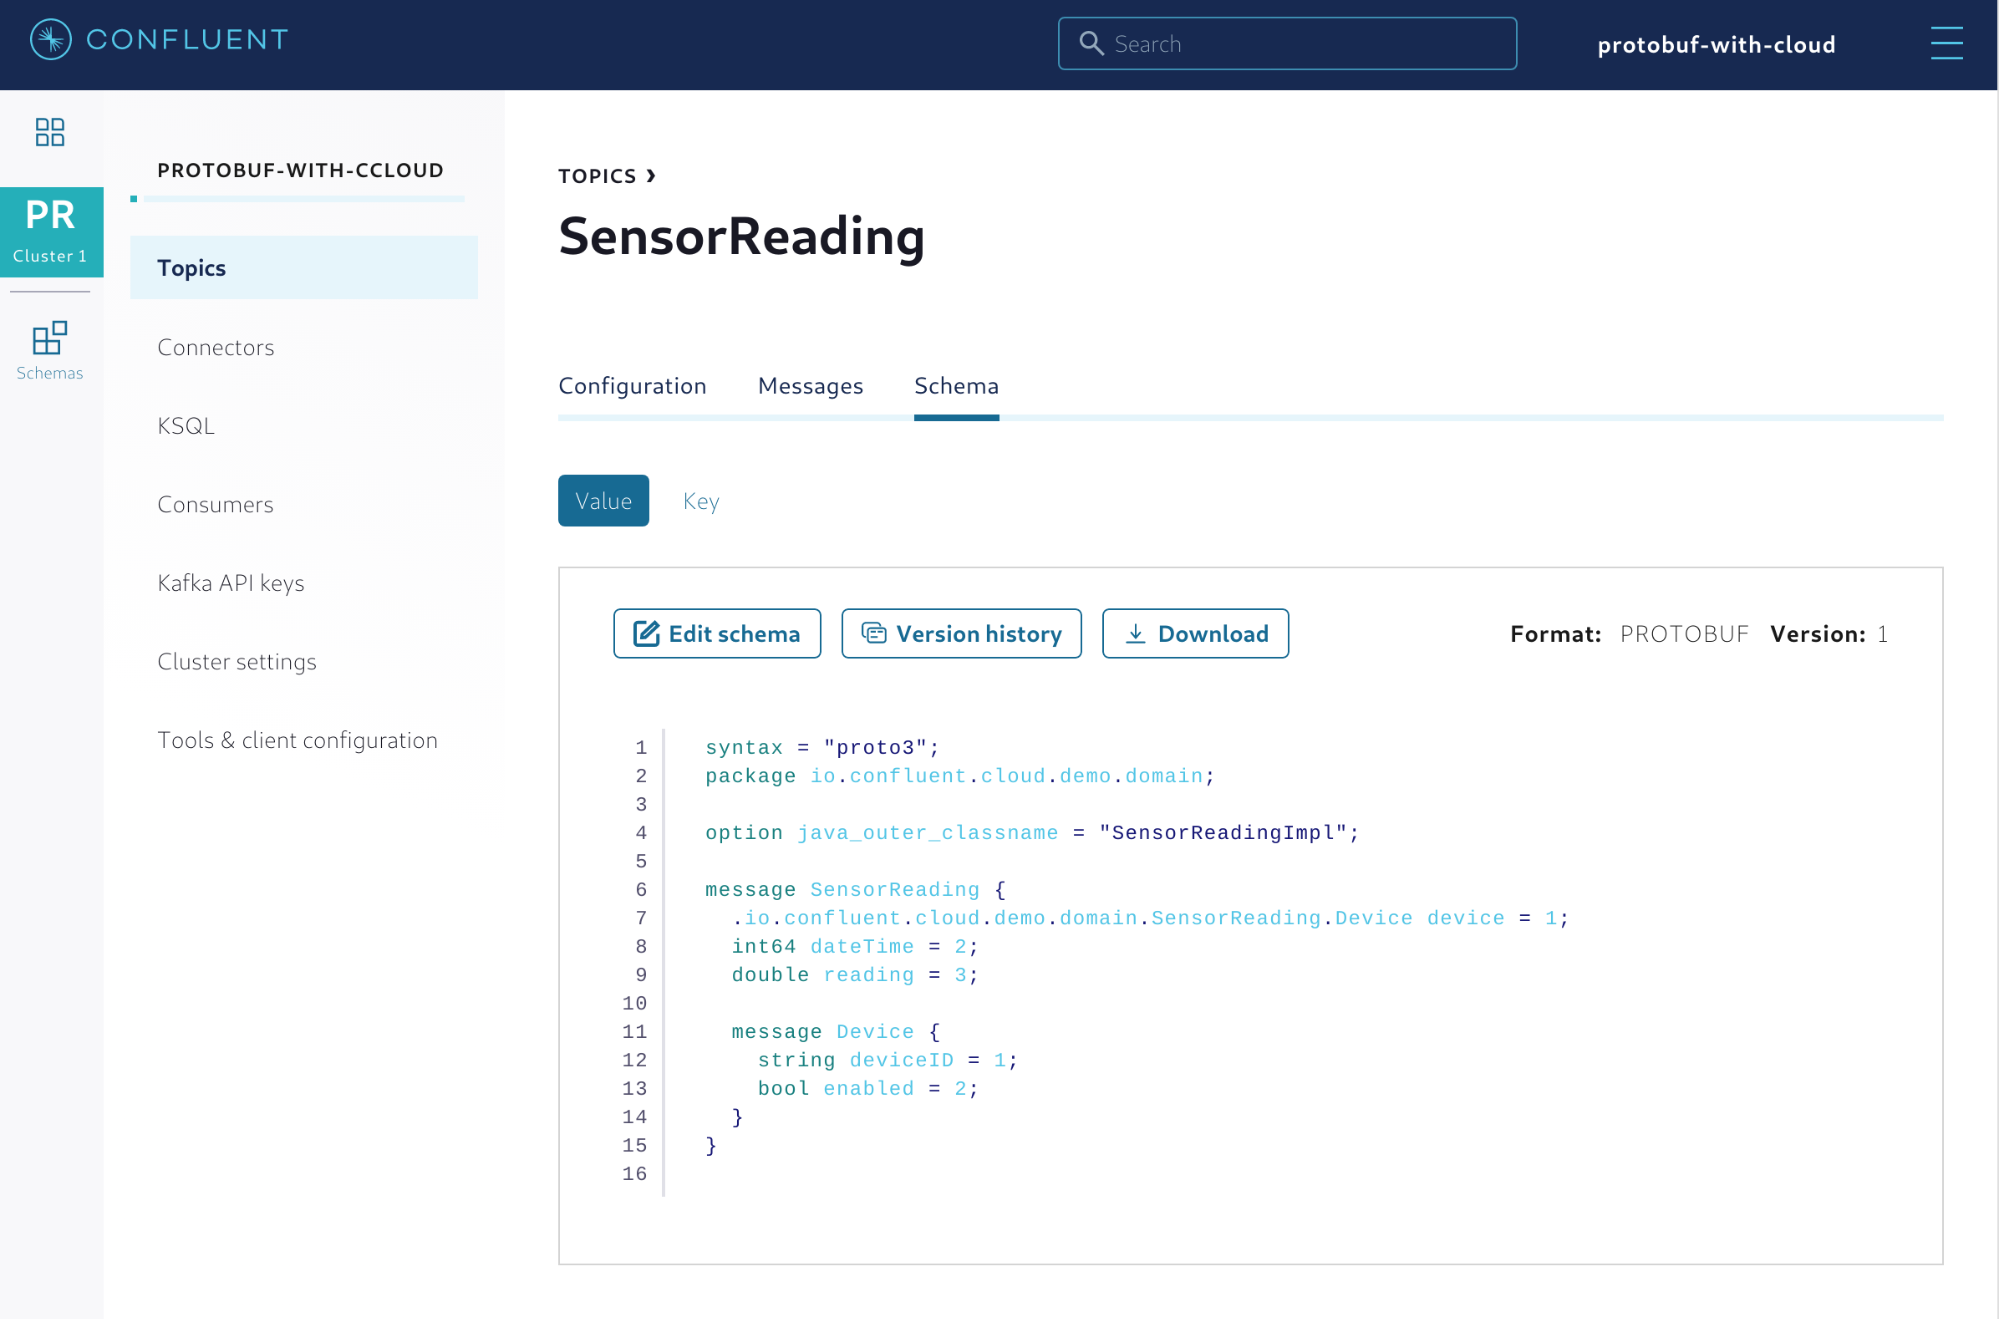 Figure 5. Protobuf schema properly registered with Confluent Cloud
From this point on, you can manage the schema using Confluent Cloud. This includes providing new versions of the schema and setting enforcement policies that will govern how client applications evolve through time.
Writing a Kafka consumer application
The code for the consumer application must also load the client configuration needed to connect to Confluent Cloud from the ccloud.properties file, so it may be a good idea to reuse the same code created for the producer shown above.
Unlike the producer, you don’t need to specify any serializer strategy but instead, specify which deserializer strategy to use. The code below shows how to implement this.
// Load from the 'ccloud.properties'
Properties configs = getConfigs();

// Append the deserialization strategy
configs.setProperty(ConsumerConfig.KEY_DESERIALIZER_CLASS_CONFIG,
   org.apache.kafka.common.serialization.StringDeserializer.class.getName());
configs.setProperty(ConsumerConfig.VALUE_DESERIALIZER_CLASS_CONFIG,
   io.confluent.kafka.serializers.protobuf.KafkaProtobufDeserializer.class.getName());
The consumer also needs to inform which Java class will be used during the deserialization strategy. Protobuf-based records are deserialized by default as a DynamicMessage, which doesn’t help your code to be strongly typed since it generically represents the data using a map of fields. To force the deserializer to use the SensorReading class, you need to inform which Java class to use.
configs.setProperty(KafkaProtobufDeserializerConfig.SPECIFIC_PROTOBUF_VALUE_TYPE,
   SensorReading.class.getName());
Finally, the consumer needs to set which consumer group it will belong to so Kafka knows how to fetch records from the partitions and deliver to this consumer. This is achieved by specifying the property group.id.
configs.setProperty(ConsumerConfig.GROUP_ID_CONFIG, ConsumerApp.class.getName());
You can now implement the code that reads the sensor readings from the Kafka topic. The code itself doesn’t look too complicated thanks to the deserializer that does the heavy lifting of reading the bytes from the record’s value and transforming the group into the desired Java class.
try (KafkaConsumer<String, SensorReading> consumer = new KafkaConsumer<>(configs)) {
   consumer.subscribe(Arrays.asList("SensorReading"));
   ConsumerRecords<String, SensorReading> records =
      consumer.poll(Duration.ofSeconds(Integer.MAX_VALUE));
   for (ConsumerRecord<String, SensorReading> record : records) {
      SensorReading sensorReading = record.value();
      Device device = sensorReading.getDevice();
      StringBuilder sb = new StringBuilder();
      sb.append("deviceID.....: ").append(device.getDeviceID()).append("\n");
      sb.append("enabled......: ").append(device.getEnabled()).append("\n");
      sb.append("dateTime.....: ").append(sensorReading.getDateTime()).append("\n");
      sb.append("reading......: ").append(sensorReading.getReading()).append("\n");
      System.out.println(sb.toString());
   }
}
A complete version of this code for both the producer and consumer applications can be found on GitHub.
Regardless of the format used to serialize the data (in this case Protobuf), Confluent Cloud helps monitor how many records might be falling behind in terms of consumption throughput. If you terminate the consumer application and only leave the producer up for a certain period of time, the Consumers menu of your cluster will show the consumer lag.
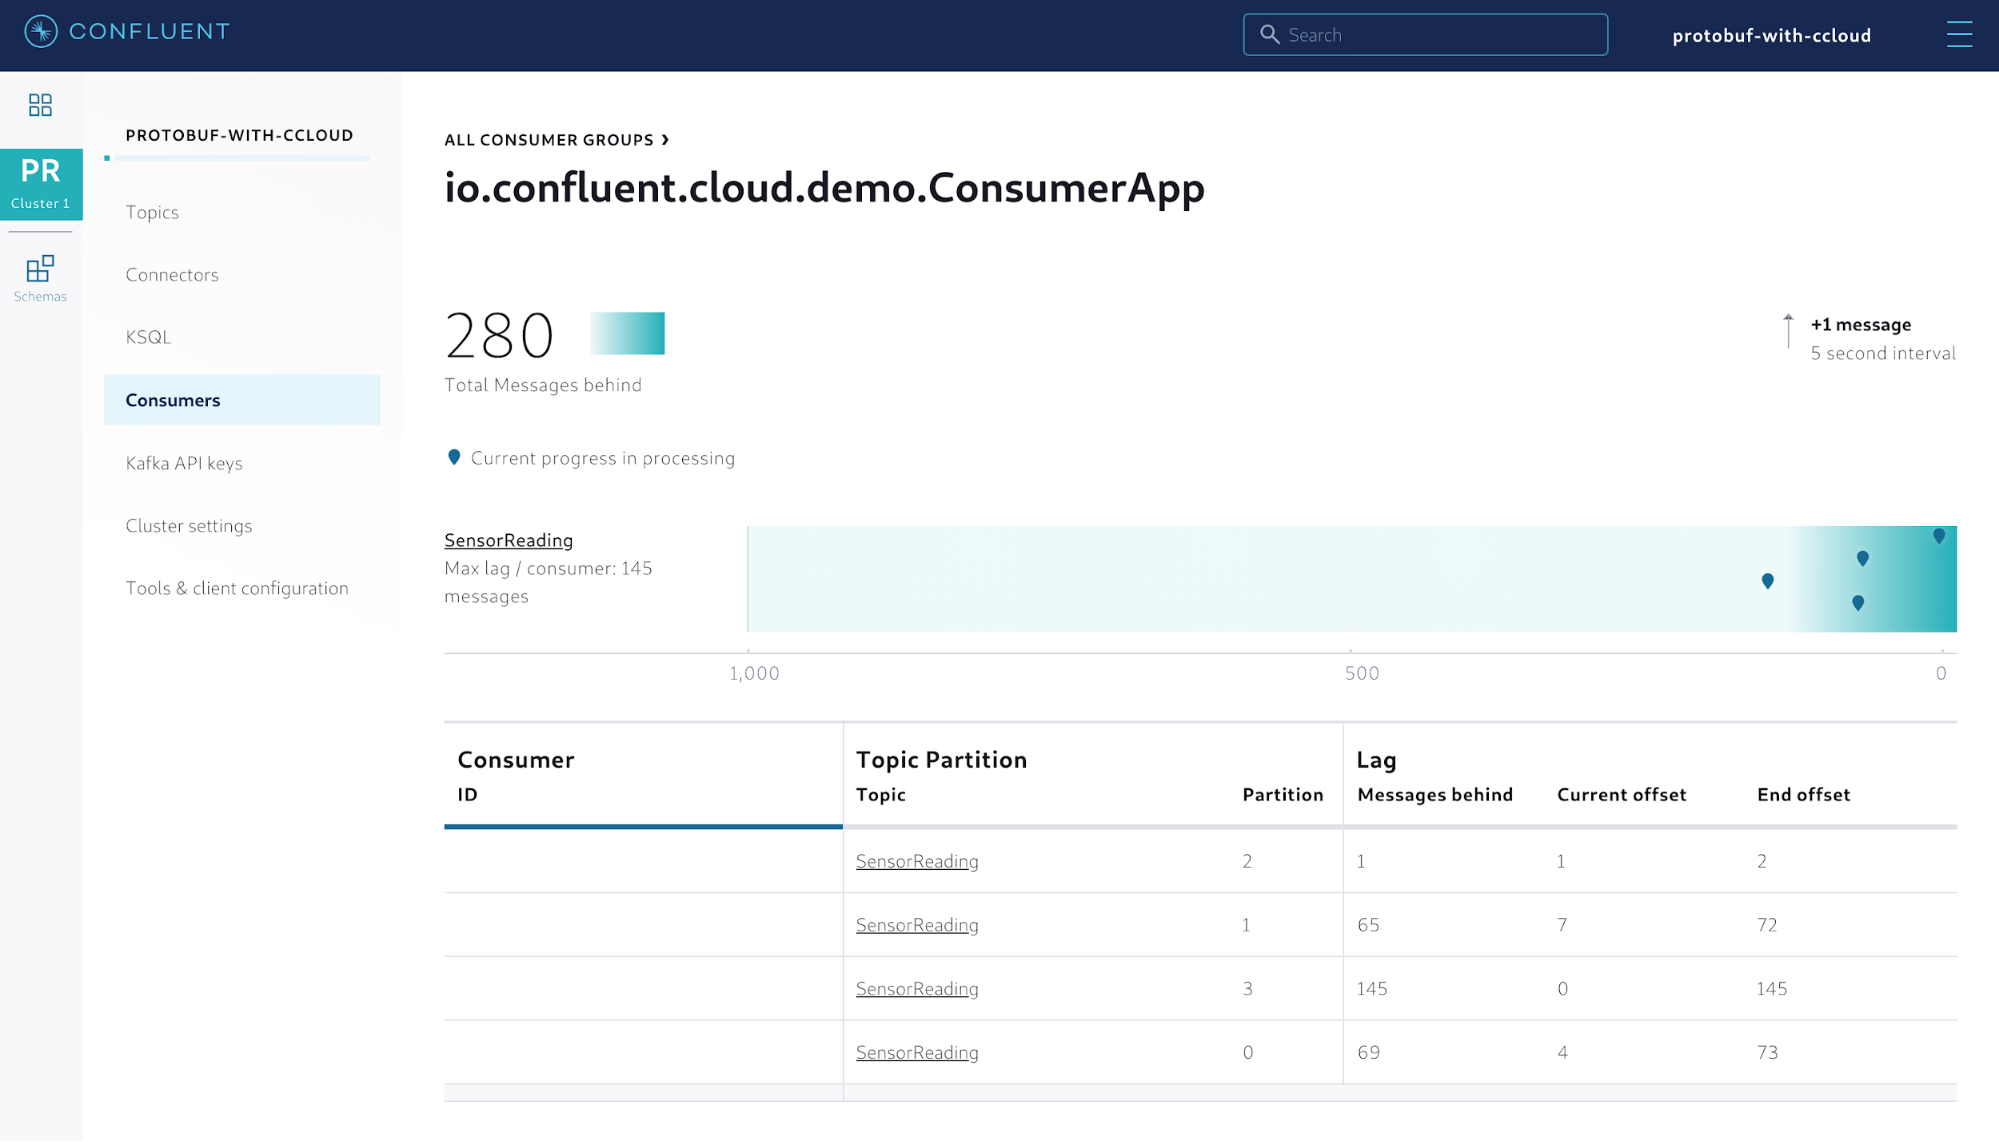 Figure 6. Monitoring how consumer groups are falling behind in terms of consumption throughput
This can be useful in detecting situations where your consumer applications become unavailable and records pile up in the partitions with no consumption whatsoever. Moreover, if a per-partition consumption is important to your application, then this feature might help to visually identify which partitions deserve more attention.
Schema lifecycle management
Up to this point, the Protobuf schema has been controlled by the producer application that uses the io.confluent.kafka.serializers.protobuf.KafkaProtobufSerializer serializer to register the schema with the managed Schema Registry while the records are being serialized. Although this is handy for demos and proofs of concept, the schema will likely be managed in Confluent Cloud and your applications will get the schemas from there to ensure a reasonable level of schema governance.
But this doesn’t need to be a manual process. Confluent provides a Maven plugin that helps in the process of registering, downloading, and checking the compatibility of schemas. For instance, if you need your code to have a local copy of the schema used for the SensorReading topic, you can use the plugin to download the schema automatically, as shown below:
<plugin>
  <groupId>io.confluent</groupId>
  <artifactId>kafka-schema-registry-maven-plugin</artifactId>
  <version>5.5.0</version>
  <configuration>
      <schemaRegistryUrls>
          <param>${schema.registry.url}</param>
      </schemaRegistryUrls>
      <userInfoConfig>${schema.registry.basic.auth.user.info}</userInfoConfig>
      <outputDirectory>schemas</outputDirectory>
      <subjectPatterns>
          <param>^SensorReading-(value)$</param>
      </subjectPatterns>
      <schemaExtension>.proto</schemaExtension>
  </configuration>
</plugin>
In order for the plugin to communicate with the managed Schema Registry, you need to provide values for the properties schemaRegistryUrls and userInfoConfig that control how the plugin will connect and authenticate with Confluent Cloud, respectively. To specify which schemas to download, provide one or multiple entries for the property subjectPatterns. This property accepts a regular expression that can be used to specify the schemas. Once you have everything set, you can execute the Maven plugin by running the following command:
mvn schema-registry:download
This will instruct the plugin to connect with Confluent Cloud and download all the schemas that match what has been specified in the property subjectPatterns into a folder called schemas.
It is recommended that you explore this plugin for your projects in order to implement a robust API strategy driven by schemas. A more detailed discussion on this recommendation can be found in this blog post written by Gwen Shapira.
Working with Protobuf in ksqlDB
Support for Protobuf is also available for ksqlDB; therefore, developers interested in creating event streaming applications using ksqlDB can leverage this too. In this case, we will reuse the same data that was sent to the SensorReading topic and transform it into a stream that can be queried and subsequently transformed into a table.
Confluent Cloud supports a managed version of ksqlDB that you can leverage for this example. The first step is to create a new ksqlDB application, as shown in Figure 7.
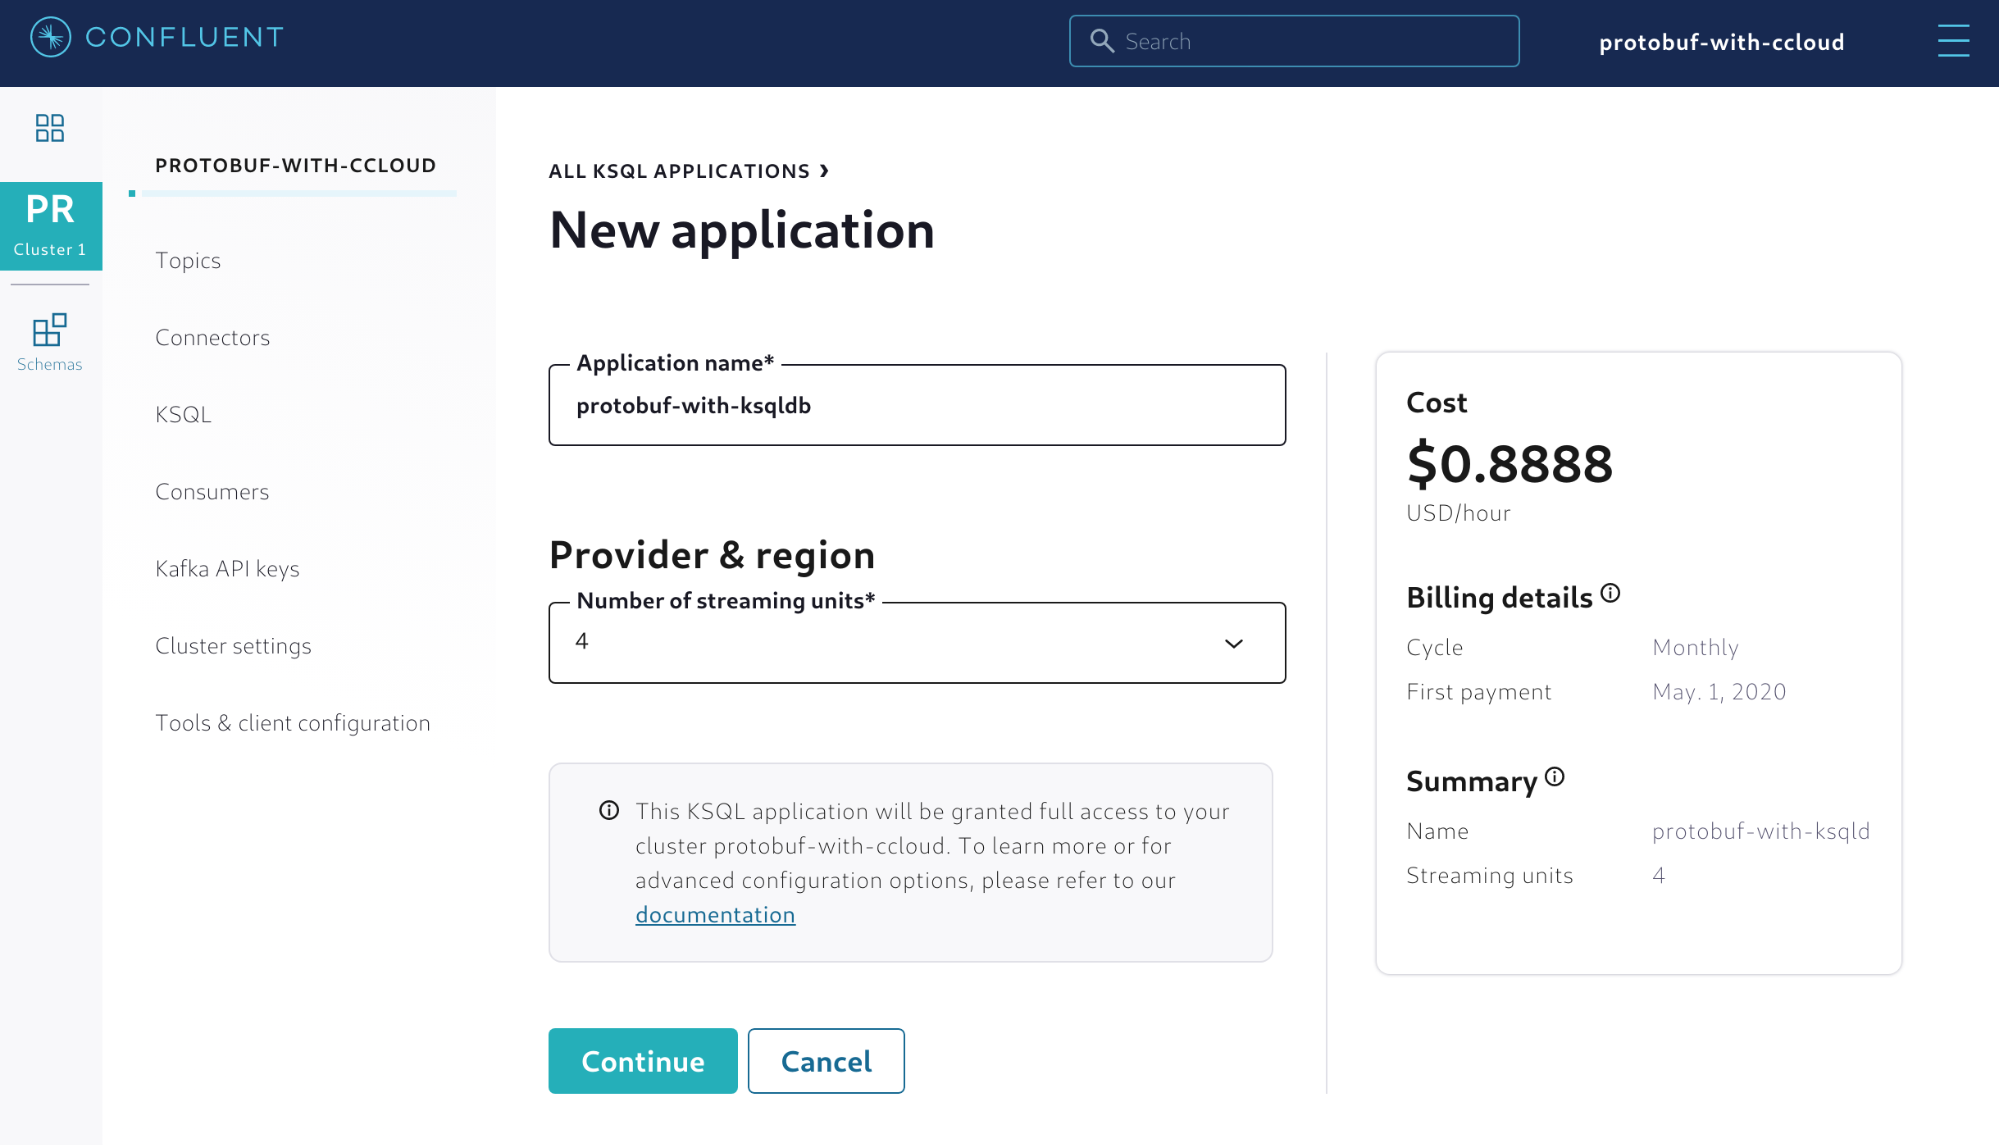 Figure 7. Creating a new ksqlDB application in Confluent Cloud
Once the ksqlDB application is created, there will also be a new service account created that has full access to the cluster. However, this service account needs to be configured regarding reading and writing permissions to topics, and you need to set up some Kafka ACLs to allow for that. Using the Confluent Cloud CLI, you can easily do this by executing the following command:
ccloud kafka acl create --allow --service-account <SERVICE_ACCOUNT_ID> --operation READ --topic SensorReading
Now you can create a stream out of the SensorReading topic. Simply go to the editor and execute the statement shown in Figure 8. With the support for Protobuf in ksqlDB, a new value format called PROTOBUF has been added for CREATE statements.
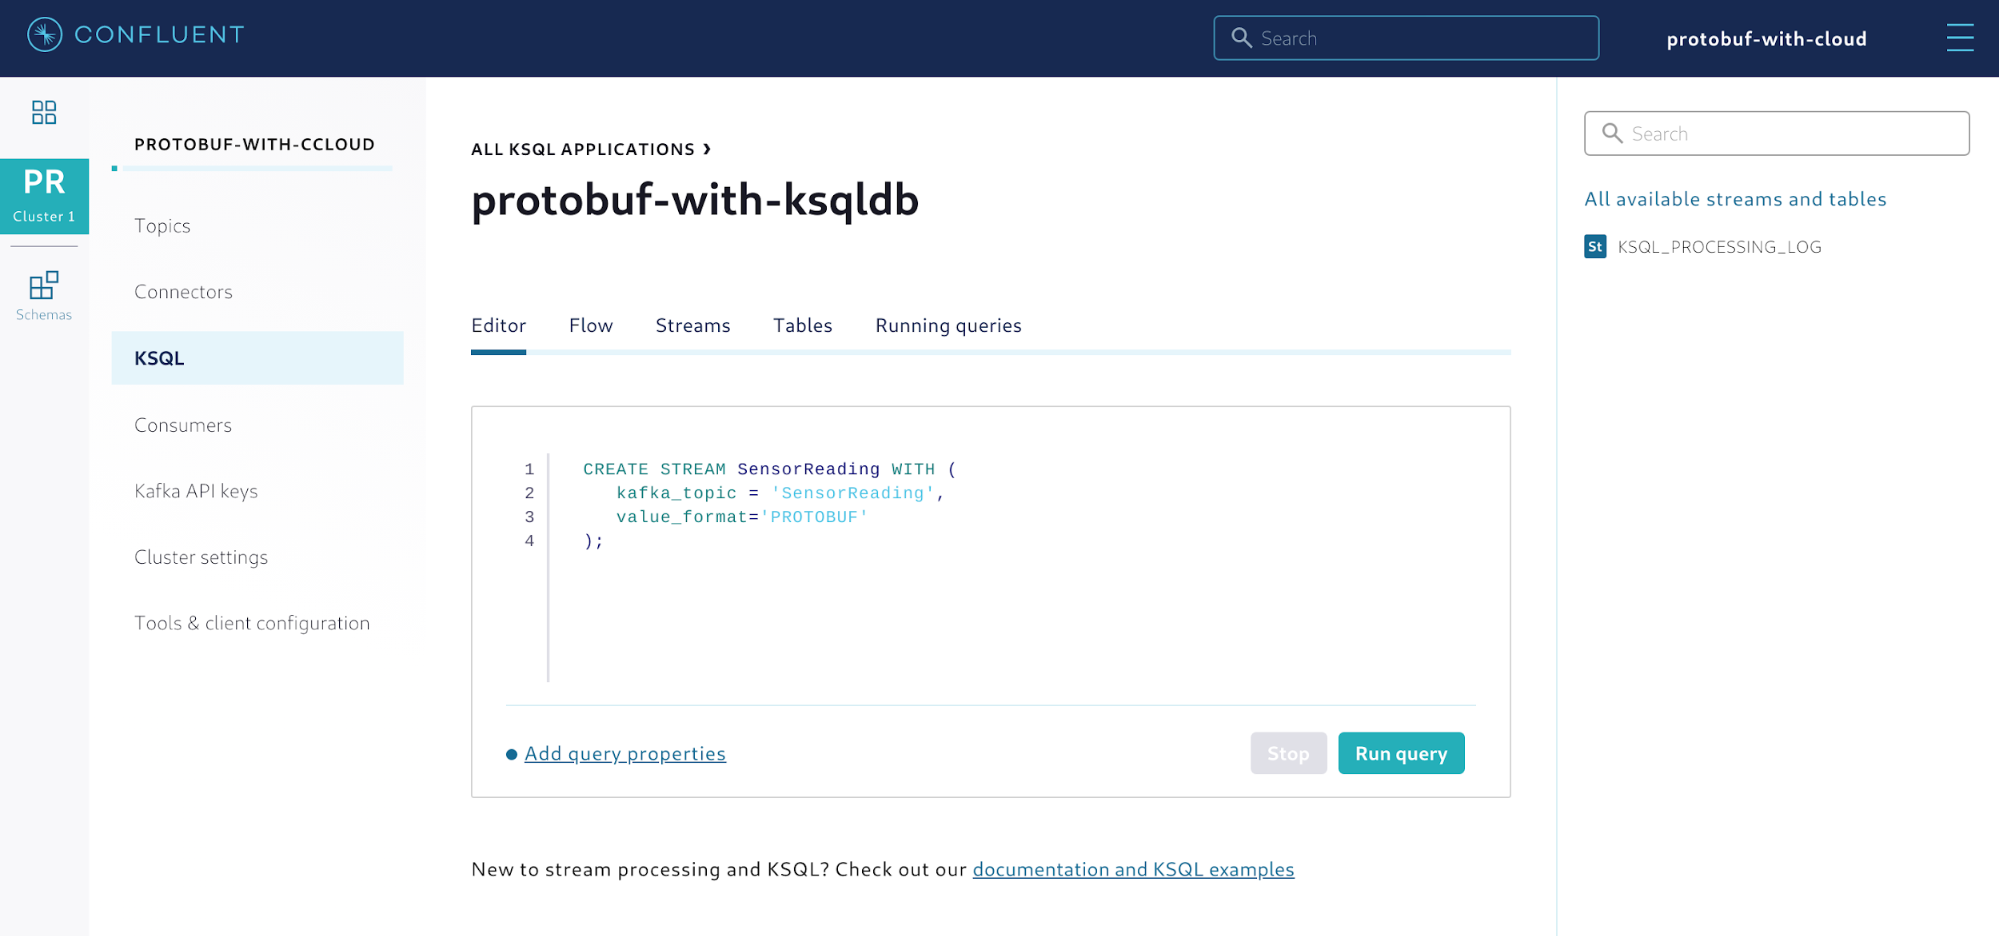 Figure 8. Creating a stream out of the Kafka topic
After creating the stream, you can execute push queries to verify if data is coming from the producer application. Execute the query SELECT * FROM SensorReading EMIT CHANGES; and the output should look like this:
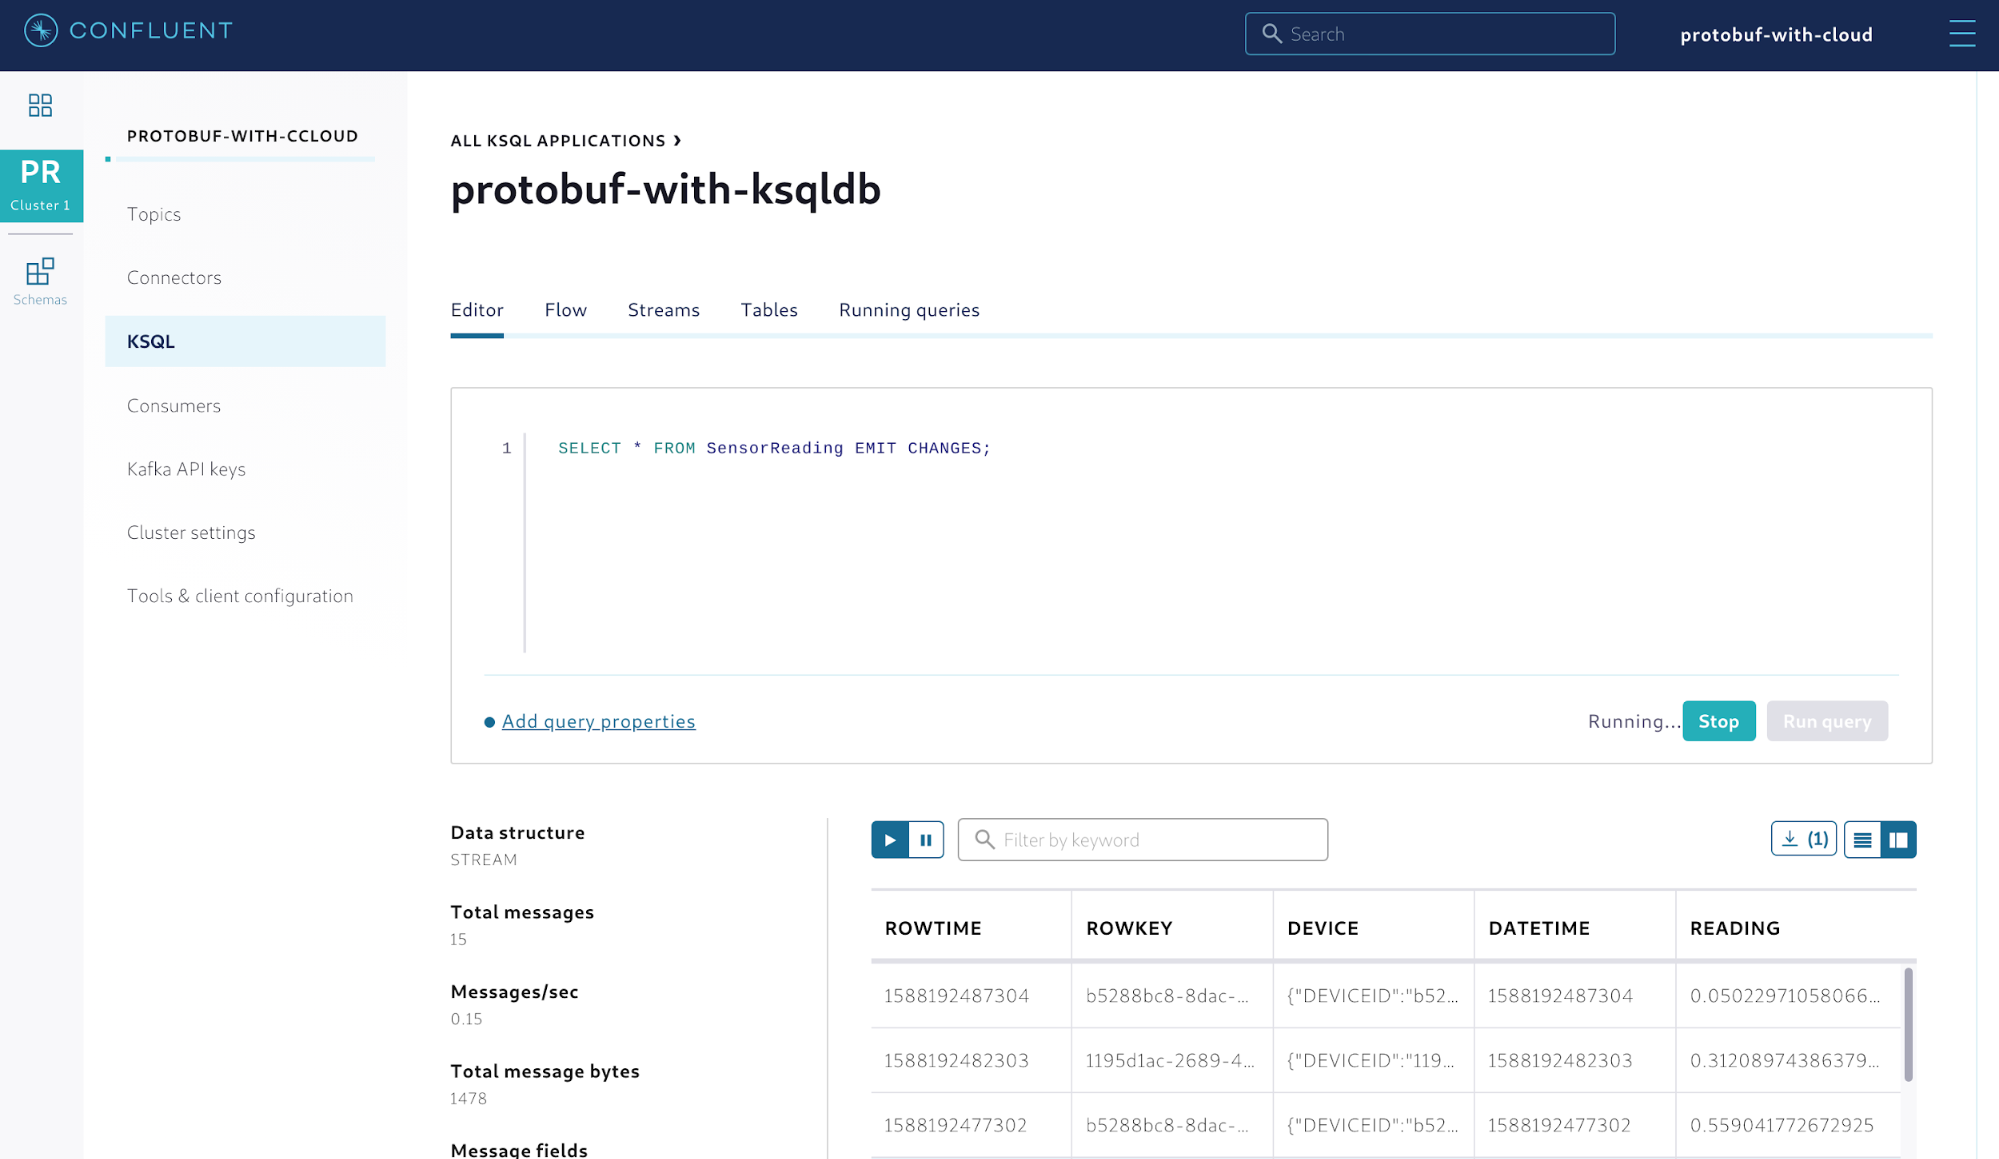 Figure 9. Querying the stream of sensor readings
Note that while you didn’t specify anything about the value schema, the stream correctly shows the data stored in the topic. This happens because ksqlDB applications are automatically integrated with the managed Schema Registry configured in the environment. Therefore, they know how to fetch schemas from there. Given that a Protobuf schema associated with the topic SensorReading already exists in Schema Registry, it can infer which schema to use.
Now that the stream is created, you can create a table from it. This table will aggregate the average reading per device.
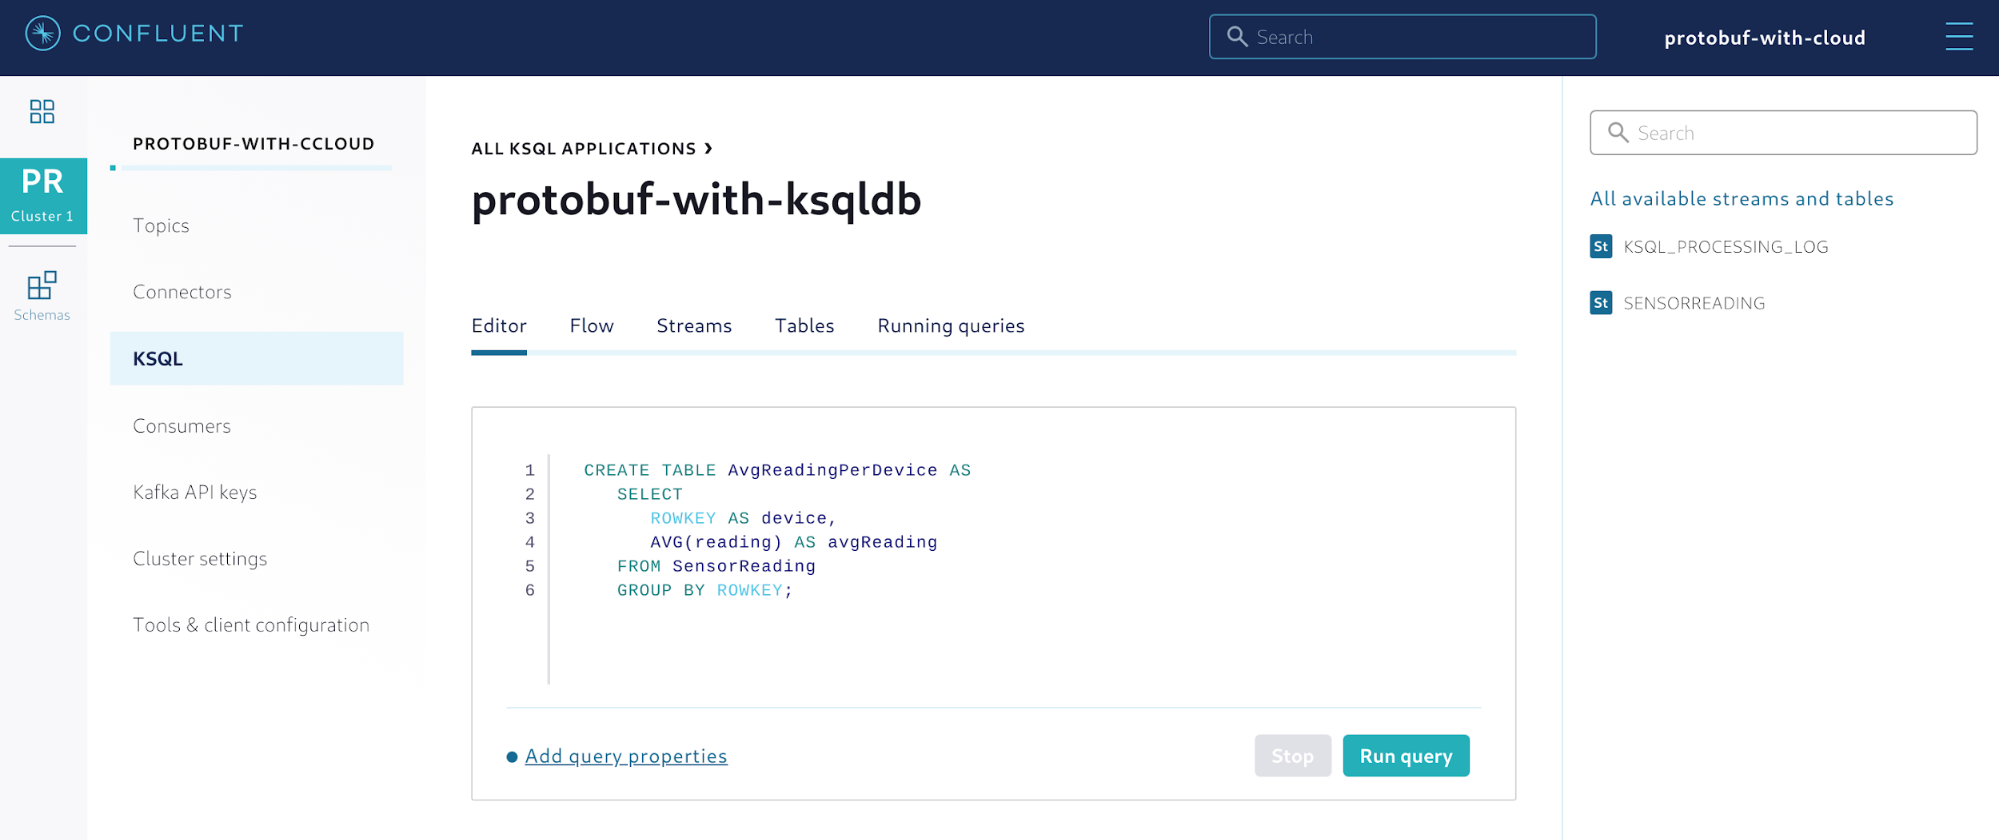 Figure 10. Creating a table to aggregate the sensor readings
A table in ksqlDB continuously materializes the data coming from the sources (in this case, the SensorReading stream), creating a point-in-time view of the data that can be queried. As new events arrive in the sources, the table gets automatically updated, which means that the data contained in the table is derived from the sources. This is shown as a flow of events using the Flow feature in Confluent Cloud.
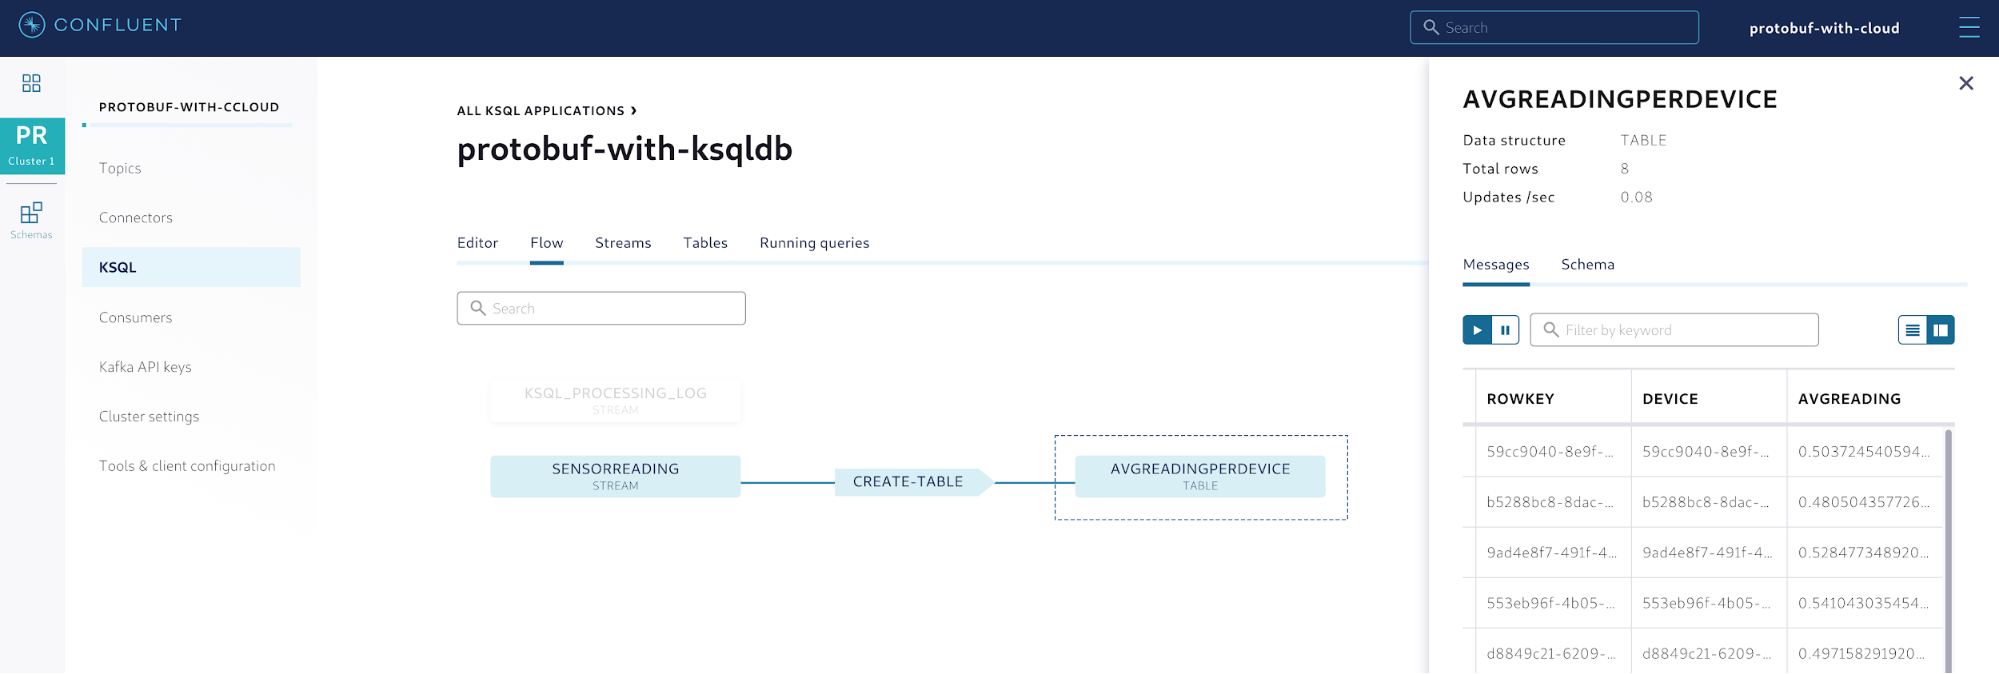 Figure 11. Flow of the events easily shown in Confluent Cloud
This feature is quite useful in order to better understand more complex topologies in event streaming applications. By providing developers with a way to understand where the data is coming from, Confluent Cloud creates unique opportunities to enhance and optimize the flow by eliminating redundant and unnecessary stages that would not be easily spotted without a graphical representation of the flow.
Using Protobuf with CLI tools
Whether you are into software development or have a DevOps role, at times you may only want to interact with Protobuf using the CLI. The good news is that this is both possible and useful for scenarios where you need to create commands to perform a series of tasks to integrate the development environment with a CI/CD platform.
First, the managed Schema Registry works just like any install that you would have on premises; therefore, you can send HTTP requests to manage the subjects and schemas. The command shown below provides an example of how to retrieve a copy of the schema associated with the topic SensorReading. Note that before issuing this HTTP request you need to have an API key and secret from the managed Schema Registry.
curl -X GET -u ":" https://prefix.region.provider.confluent.cloud/subjects/SensorReading-value/versions/1
This command will retrieve a JSON payload that contains different fields such as subject, version, id, schemaType, and schema. If you only need to retrieve the schema itself, you can combine that command with the JSON processor jq. For instance, you can download a copy of the schema locally and save into a file named sensorReading.proto.
curl -X GET -u "<SR_API_KEY>:<SR_API_SECRET>" https://prefix.region.provider.confluent.cloud/subjects/SensorReading-value/versions/1 | jq '.schema' > sensorReading.proto
You can also produce and consume records using the tools available with the Confluent Platform. Confluent Platform includes all the tools that are available in Kafka installations but also introduces exclusive ones to make life easier for developers. For instance, there is a tool called kafka-protobuf-console-consumer that works exactly the same as the one that comes with Kafka (known as kafka-console-consumer) but supports interacting with Schema Registry natively. It also has the ability to deserialize records based on Protobuf.
The command shows an example of how to consume serialized records using Protobuf and how to use the managed Schema Registry to retrieve the schema for the topic SensorReading.
kafka-protobuf-console-consumer \
   --bootstrap-server prefix.region.provider.confluent.cloud:9092 \
   --consumer.config=ccloud.properties \
   --property schema.registry.url=https://prefix.region.provider.confluent.cloud \
   --property basic.auth.credentials.source=USER_INFO \
   --property basic.auth.user.info=<SR_API_KEY>:<SR_API_SECRET> \
   --topic SensorReading
Summary
Confluent Cloud is an event streaming platform made available as a fully managed service that allows you to build applications faster and with confidence. With support for Protobuf and JSON Schemas, Confluent Cloud offers more serialization options for developers besides Avro.
This blog post showed how to leverage support for Protobuf, which is one of the most used formats among developers these days. It also detailed how to create producer and consumer applications, as well as how to leverage support for ksqlDB applications.
Ready to start?
Sign up for Confluent Cloud today and start streaming with the best managed service for Apache Kafka. It is also available on Google Cloud Platform Marketplace and on Microsoft Azure Marketplace.
Get started with Confluent, for free
Watch demo: Kafka streaming in 10 minutes
Avez-vous aimé cet article de blog ? Partagez-le !
Abonnez-vous au blog Confluent


Schema Registry Clients in Action
Learn about the bits and bytes of what happens behind the scenes in the Apache Kafka producer and consumer clients when communicating with the Schema Registry and serializing and deserializing messages.

How to Securely Connect Confluent Cloud with Services on Amazon Web Services (AWS), Azure, and Google Cloud Platform (GCP)
The rise of fully managed cloud services fundamentally changed the technology landscape and introduced benefits like increased flexibility, accelerated deployment, and reduced downtime. Confluent offers a portfolio of fully managed...