[Webinar] Harnessing the Power of Data Streaming Platforms | Register Now
How to Manage Secrets for Confluent with Kubernetes and HashiCorp Vault
Get started with Confluent, for free
Watch demo: Kafka streaming in 10 minutes
This blog post walks through an end-to-end demo that uses the Confluent Operator to deploy Confluent Platform to Kubernetes. We will deploy a connector that watches for commits to a GitHub repository and then write those commit messages to an Apache Kafka® topic in Confluent Platform. The connector will authenticate with GitHub using secret credentials that are securely stored in HashiCorp’s Vault and accessed by the connector in a highly secure and automated manner.
Background
Modern systems consist of services and users connecting with each other over a network, whether it’s:
- Components within a platform, like Kafka Connect workers connecting with Kafka
- User applications connecting with a platform, like a developer’s application producing data to Kafka
- From one platform to another, like Connect pulling data from a SQL database and pushing it into Kafka
Securing communications between applications and services requires strong protection and minimal sharing of credentials. Each component in a distributed system needs to be able to access their limited subset of secrets and credentials at runtime without risking exposure.
The most simplistic way to ensure that a service has the credentials it needs to connect to other services is for a developer or operator responsible for the service to find the secret credential information, paste it into a configuration file, and start the service process on a machine where the configuration file is present. However, this workflow presents many problems:
- Developers and operators don’t need to see the credentials; only the services need them. Well-intentioned people can accidentally leak credentials, and malicious actors may even do so intentionally.
- Having plaintext credentials in config files, which are typically written to disk, means that the disk becomes another avenue for sensitive data to be leaked or stolen.
- This process doesn’t scale:
- On Day 1, if you have thousands of services, then manual processes for credential distribution can significantly eat away at the time a business spends delivering real value.
- On Day 2, when you need to change credentials (resetting passwords, refreshing expired certificates, etc.) across thousands of services and credentials, manual processes are untenable.
- This process is slow—often credentials need to be changed quickly; for example, if a credential for Service A is compromised and a new credential needs to be issued to Service A, then Service A may experience downtime until its credentials are replaced, which may severely impact the business.
- Credential management needs special attention. Because of their sensitive nature, state-of-the-art technology in the area of cryptography is needed to properly store and distribute credentials as opposed to more simplistic approaches.
For Confluent Platform users, the ideal solution ensures:
- Credentials are only ever physically stored in an industry-standard, state-of-the-art, purpose-built service for secure secret management
- Access to secrets over the network is subject to tight policy-based access controls that only a few trusted employees can manage
- Operators can deploy Confluent Platform into a runtime environment that can be granted the minimal policies needed to access credentials needed for Confluent Platform to function (a small subset of all credentials for the entire organization)
- Credentials only travel over the network via a secure connection at start time and are held only in memory by the Confluent Platform system components that need them during runtime
- Credentials are never written in plaintext to any log files
A common solution to this secret management problem is to use HashiCorp’s Vault. Vault is an open source, cloud-agnostic, industry-leading secret management product with enormous traction in the broader ecosystem, and one of the most highly sought-after secret management solutions amongst Confluent Platform users.
Demo
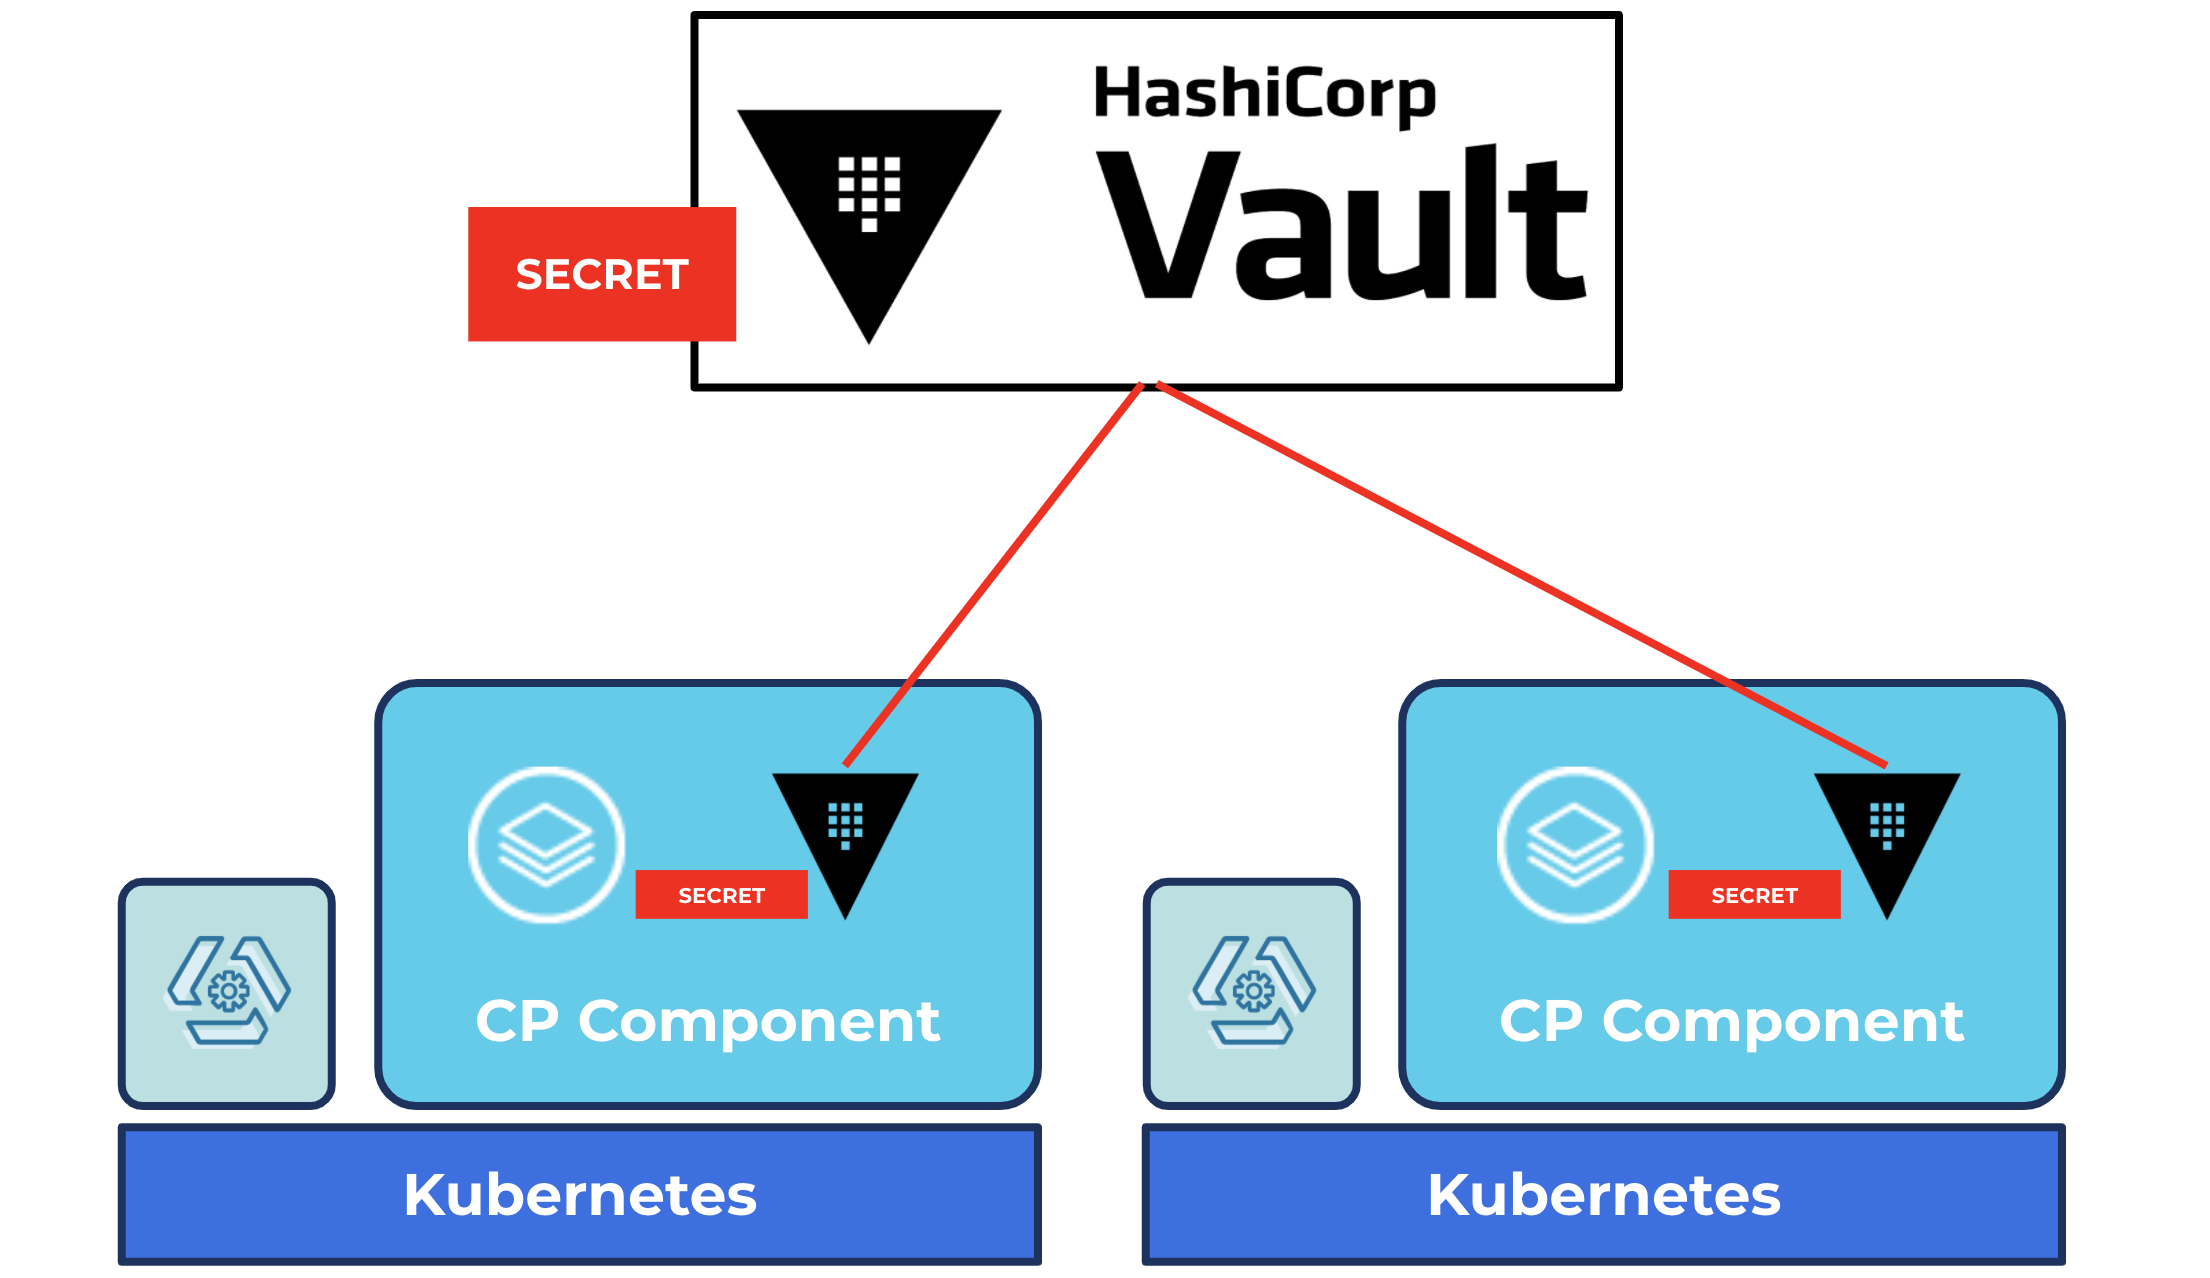
Using the Confluent Operator, you can deploy Confluent Platform on Kubernetes and configure connectors such that the sensitive configuration credentials needed for the connectors are stored only in HashiCorp Vault.
In this demo, we’ll set up a connector that watches all commits on a GitHub repo and writes the commit messages to a Kafka topic in Confluent Platform. The connector will need GitHub credentials to be able to watch for commits to the repo. The connector will be configured via a request to the Kafka Connect REST API, but the request payload will not need to contain any sensitive credentials because they will be securely delivered to the connector’s runtime environment via a seamless integration between Confluent Operator and HashiCorp Vault.
HashiCorp Vault for managing secrets
The following steps use:
- Google Kubernetes Engine (GKE) 1.18.12-gke.1210 (though any Kubernetes distribution conformant to Cloud Native Computing Foundation standards can be used, and these steps will work for many versions of Kubernetes other than 1.18.x)
- Helm v3
- The latest HashiCorp Vault Helm chart, as per this guide
- Confluent Operator 1.7.0 and Confluent Platform 6.1.0
- We will deploy one Operator Pod and use that to deploy three ZooKeeper Pods, three Kafka Pods, one Confluent Control Center Pod, and one Connect worker Pod
- Kafka Connect GitHub Source Connector v1.0.3
Step 1: Launch a GKE cluster
For this demonstration, we are using a seven-node GKE cluster on version 1.18.12-gke.1210; each node is an e2-medium. For the most part, this is a default installation with no specific configuration except the node count. The equivalent gcloud command to launch the cluster is this:
$ gcloud container clusters create "cluster-1" \
  --project  \
  --zone "us-central1-c" \
  --cluster-version "1.18.12-gke.1210" \
  --num-nodes "7"
Replace <your-GCP-project-id> as appropriate.
Then configure your command line to be able to connect to your GKE cluster:
$ gcloud container clusters get-credentials cluster-1 \
  --zone us-central1-c \
  --project <your-GCP-project-id>
Step 2: Deploy and initialize Vault
If you’ve never worked with Vault, it might be worth going through this tutorial end to end, and then coming back to this demo. The following instructions are largely based on that tutorial, with some differences, such as deploying to GKE instead of minikube (local laptop Kubernetes). In addition, we’ll be putting in a GitHub access token for the Connect workers instead of the example deployed in that tutorial.
First, create a Kubernetes namespace where we’ll deploy Vault:
$ kubectl create namespace hashicorp
Note that we created a namespace called hashicorp. Later, we’ll create a namespace called confluent to deploy Confluent Operator and Confluent Platform. This will help with security and isolation. In production, you will likely deploy Vault to a completely different Kubernetes cluster and you may deploy many instances of Confluent Platform to many Kubernetes clusters, all of which can fetch credentials from the same central Vault.
Next, use the Helm tool to fetch HashiCorp’s Helm charts:
$ helm repo add hashicorp https://helm.releases.hashicorp.com
Now, we can deploy Vault to our hashicorp namespace using the Vault Helm Chart. We’ll deploy it in developer mode to keep this demo simple and easy:
$ helm install vault hashicorp/vault \
  --namespace hashicorp \
  --set "server.dev.enabled=true"
| ℹ️ | Note: Running a Vault server in development is automatically initialized and unsealed. This is ideal in a learning environment but not recommended for a production environment. |
Next, we’ll make sure that workloads running on this Kubernetes cluster, such as the Connect workers we’ll soon deploy, can authenticate with Vault. In a future step, we’ll store a credential in Vault and configure permissions so that only the Connect workers can access it.
$ kubectl exec -it vault-0 --namespace hashicorp -- /bin/sh
The previous command opened an interactive shell session within the Vault container. The next two commands are executed from within that shell session.
Instruct Vault to treat Kubernetes as a trusted identity provider for authentication to Vault:
/ $ vault auth enable kubernetes
Configure Vault to know how to connect to the Kubernetes API (the API of the very same Kubernetes cluster where Vault is deployed) to authenticate requests made to Vault by a principal whose identity is tied to Kubernetes, such as a Kubernetes Service Account.
/ $ vault write auth/kubernetes/config \
    token_reviewer_jwt="$(cat /var/run/secrets/kubernetes.io/serviceaccount/token)" \
    kubernetes_host="https://$KUBERNETES_PORT_443_TCP_ADDR:443" \
    kubernetes_ca_cert=@/var/run/secrets/kubernetes.io/serviceaccount/ca.crt
We can now exit the Vault shell session:
/ $ exit
Step 3: Create a GitHub repo and access token
Create a repo such as https://github.com/<your-GitHub-username>/testconnect, and a personal access token with public_repo and repo:status permissions. Of course, replace <your-GitHub-username> with your GitHub username.
In a realistic situation, personal access tokens would not be used, and the person who will eventually deploy Confluent Platform will not be the person with access to the important credentials. For this demo, you are acting as all personas and using a personal access token.
Step 4: Store the access token in Vault and configure permissions
With the next few steps, we’ll store the GitHub access token in Vault and configure permissions such that only the connect Kubernetes Service Account in the confluent Kubernetes namespace can read this credential. The ability to integrate authorization in one system (Vault) with identity in a completely different system (Kubernetes) in a way that is both seamless and loosely coupled is very powerful.
First, open an interactive shell session in the Vault container:
$ kubectl exec -it vault-0 --namespace hashicorp -- /bin/sh
Now, from within that session, enable kv-v2 secrets at the path internal:
/ $ vault secrets enable -path=internal kv-v2
Store the GitHub access token, replacing <your-GitHub-access-token> with the token that you created in the previous step:
/ $ vault kv put internal/github \
    accesstoken="<your-GitHub-access-token>"
The way permission management works in Vault is that you create policies which describe a set of permissions, and then you bind policies to principals (such as users and Service Accounts) thereby granting the permissions in the policy to those principals.
Create a policy that allows reading this GitHub access token:
/ $ vault policy write gh-read - <<EOF
path "internal/data/github" {
  capabilities = ["read"]
}
EOF
Then, grant the connect Service Account access to the GitHub access token by binding it to the above policy. We’ll create the Service Account in the following step when we prepare to deploy Confluent Platform, but we can perform the policy binding now while we’re still in the Vault shell:
/ $ vault write auth/kubernetes/role/connect \
    bound_service_account_names=connect \
    bound_service_account_namespaces=confluent \
    policies=gh-read \
    ttl=24h
Exit the Vault shell:
/ $ exit
Step 5: Prepare to deploy Confluent Platform
Run the following:
$ kubectl create namespace confluent
$ kubectl create serviceaccount connect --namespace confluent
The connect Service Account will be associated with our deployment of the Connect worker, enabling it to access the GitHub access token that we stored in Vault, without us having to provide that credential in plaintext when we POST the connector configuration to the Connect REST API.
Step 6: Publish a Connect worker Docker image with the GitHub connector
We’ll create a working directory for the purposes of building the Connect worker image. We’ll only need this directory temporarily, so we can create a subdirectory under the /tmp directory, for example:
$ mkdir /tmp/my-connect
Write a Dockerfile that will be used to create an image, which includes the GitHub source connector:
$ echo "FROM confluentinc/cp-server-connect-operator:6.1.0.0
USER root
RUN confluent-hub install --no-prompt
confluentinc/kafka-connect-github:1.0.1
USER 1001" > /tmp/my-connect/Dockerfile
Build and push the image, replacing <your-DockerHub-username> with your actual Docker Hub username so that the images are properly tagged and pushed to your account:
$ docker build /tmp/my-connect \
  -t <your-DockerHub-username>/my-connect:0.0.1

$ docker push <your-DockerHub-username>/my-connect:0.0.1
Step 7: Deploy Confluent Platform
Next, download the Confluent Operator bundle. If your browser does not automatically extract the bundle into a directory like ~/Downloads/confluent-operator-1.7.0, you can extract it yourself as follows, replacing <path-to-downloaded-bundle> to the path where your unextracted bundle was downloaded:
$ mkdir -p ~/Downloads/confluent-operator-1.7.0

$ tar -xzf <path-to-downloaded-bundle> \
  -C ~/Downloads/confluent-operator-1.7.0
For subsequent steps, we’ll assume that the contents are extracted to the ~/Downloads/confluent-operator-1.7.0 directory.
Use the configuration file config.yaml provided below to deploy Operator, ZooKeeper, Kafka, Confluent Control Center, and Connect:
global:
  provider:
    name: gcp
    region: us-central1
    registry:
      fqdn: docker.io
      credential:
        required: false

zookeeper:
  resources:
    requests:
      cpu: 200m
      memory: 512Mi

kafka:
  resources:
    requests:
      cpu: 200m
      memory: 1Gi
  metricReporter:
    enabled: false

connect:
  podAnnotations:
    vault.hashicorp.com/agent-inject: "true"
    vault.hashicorp.com/role: "connect"
    vault.hashicorp.com/agent-inject-secret-database-config.txt: "internal/data/github"
    vault.hashicorp.com/agent-inject-template-database-config.txt: |
      {{- with secret "internal/data/github" -}}
      accesstoken={{ .Data.data.accesstoken }}
      {{- end -}}
  serviceAccountName: connect
  resources:
    requests:
      memory: 256Mi
  image:
    repository: <your-DockerHub-username>/my-connect
    tag: "0.0.1"
  replicas: 1
  dependencies:
    kafka:
      bootstrapEndpoint: kafka:9071
      brokerCount: 3

controlcenter:
  resources:
    requests:
      memory: 1Gi
  dependencies:
    c3KafkaCluster:
      brokerCount: 3
      bootstrapEndpoint: kafka:9071
      zookeeper:
        endpoint: zookeeper:2181
    connectCluster:
      enabled: true
      url: http://connectors:8083
  auth:
    basic:
      enabled: true
      property:
        admin: Developer1,Administrators
        disallowed: no_access
Take note of the most interesting parts of the configuration:
connect:
  ...
  serviceAccountName: connect
The above snippet binds the Connect worker Pods to the connect Service Account, which is authorized to read the credential from Vault.
connect:
  ...
  podAnnotations:
    vault.hashicorp.com/agent-inject: "true"
    vault.hashicorp.com/role: "connect"
    vault.hashicorp.com/agent-inject-secret-database-config.txt: "internal/data/github"
    vault.hashicorp.com/agent-inject-template-database-config.txt: |
      {{- with secret "internal/data/github" -}}
      accesstoken={{ .Data.data.accesstoken }}
      {{- end -}}
The above annotations will trigger all the magic that will result in the Vault secret (GitHub access token) being written to an in-memory filesystem dynamically mounted to the Connect worker container. The format of the file will match what’s needed to leverage the Confluent Platform Externalizing Secrets capability.
Make sure to replace <your-DockerHub-username> in the example config.yaml file with your Docker Hub username so that Connect is deployed with the Docker image published in the previous step:
connect:
  ...
  image:
    repository: <your-DockerHub-username>/my-connect
    tag: "0.0.1"
Install all the relevant Confluent Platform components with the following commands:
$ helm upgrade --install operator \
  ~/Downloads/confluent-operator-1.7.0/helm/confluent-operator \
  -f config.yaml \
  --set operator.enabled=true \
  --namespace confluent

$ helm upgrade --install zookeeper \
  ~/Downloads/confluent-operator-1.7.0/helm/confluent-operator \
  -f config.yaml \
  --set zookeeper.enabled=true \
  --namespace confluent

$ helm upgrade --install kafka \
  ~/Downloads/confluent-operator-1.7.0/helm/confluent-operator \
  -f config.yaml \
  --set kafka.enabled=true \
  --namespace confluent

$ helm upgrade --install controlcenter \
  ~/Downloads/confluent-operator-1.7.0/helm/confluent-operator \
  -f config.yaml \
  --set controlcenter.enabled=true \
  --namespace confluent

$ helm upgrade --install connect \
  ~/Downloads/confluent-operator-1.7.0/helm/confluent-operator \
  -f config.yaml \
  --set connect.enabled=true \
  --namespace confluent
Step 8: Create and watch a topic
The Confluent Control Center UI is deployed but not accessible from outside the Kubernetes cluster. We can use port forwarding to open the Control Center in your browser on localhost.
Use the Control Center UI to create a topic called github-commits and keep the browser open; we’ll watch the messages stream in later.
$ kubectl port-forward service/controlcenter 9021 \
  --namespace confluent
Navigate to http://localhost:9021 in your browser. The basic authentication credentials are admin/Developer1.
If you see an error in your browser, it may be that the Control Center is not running and ready to accept connections yet. You can run the following command in a new shell (don’t cancel the above kubectl port-forward command):
$ kubectl get pod controlcenter-0 --watch --namespace confluent
Wait until you see output that says 1/1 Pods are READY:
NAME              READY   STATUS    RESTARTS   AGE
...
controlcenter-0   1/1     Running   0          91s
Cancel the kubectl get pod command once you see the desired readiness state.
Step 9: Create the connector
We’ll come back to the Confluent Control Center UI soon so we’ll leave the kubectl port-forward command from the previous section running. Like Control Center, the Connect API is not exposed over the Internet. Open a new shell session and run port forwarding so you’ll be able to curl the Connect API locally:
$ kubectl port-forward service/connectors 8083 --namespace confluent
Use the configuration file github-connector.json provide below to create the connector. Change <your-GitHub-username> in the github-connector.json file accordingly.
{
  "name" : "MyGitHubConnector",
  "config" :
  {
    "connector.class" : "io.confluent.connect.github.GithubSourceConnector",
    "confluent.topic.bootstrap.servers": "kafka:9071",
    "confluent.topic.replication.factor": "1",
    "confluent.topic.sasl.jaas.config": "org.apache.kafka.common.security.plain.PlainLoginModule required username=\"${file:/mnt/secrets/global_sasl_plain_username:username}\" password=\"${file:/mnt/secrets/global_sasl_plain_password:password}\";",
    "confluent.topic.sasl.mechanism": "PLAIN",
    "confluent.topic.security.protocol": "SASL_PLAINTEXT",
    "tasks.max" : "1",
    "github.service.url":"https://api.github.com",
    "github.access.token":"${file:/vault/secrets/database-config.txt:accesstoken}",
    "github.repositories":"<your-Github-username>/testconnect",
    "github.tables":"commits",
    "topic.name.pattern":"github-${entityName}"
  }
}
Open up one more shell session and submit the connector configuration:
$ curl -sS -X POST -H 'Content-Type: application/json' \
  --data @/tmp/github-connector.json \
  http://localhost:8083/connectors
You may need to restart your Connect worker per the Externalizing Secrets documentation. The easiest way to do this is just to delete the Connect worker and let Operator/Kubernetes automatically resurrect it:
$ kubectl rollout restart statefulset/connectors --namespace confluent
Step 10: Commit to your repo and watch the messages stream into your topic
Create a few commits to your repo and push them up to GitHub. For example, you might generate a git commit history that looks like the following:
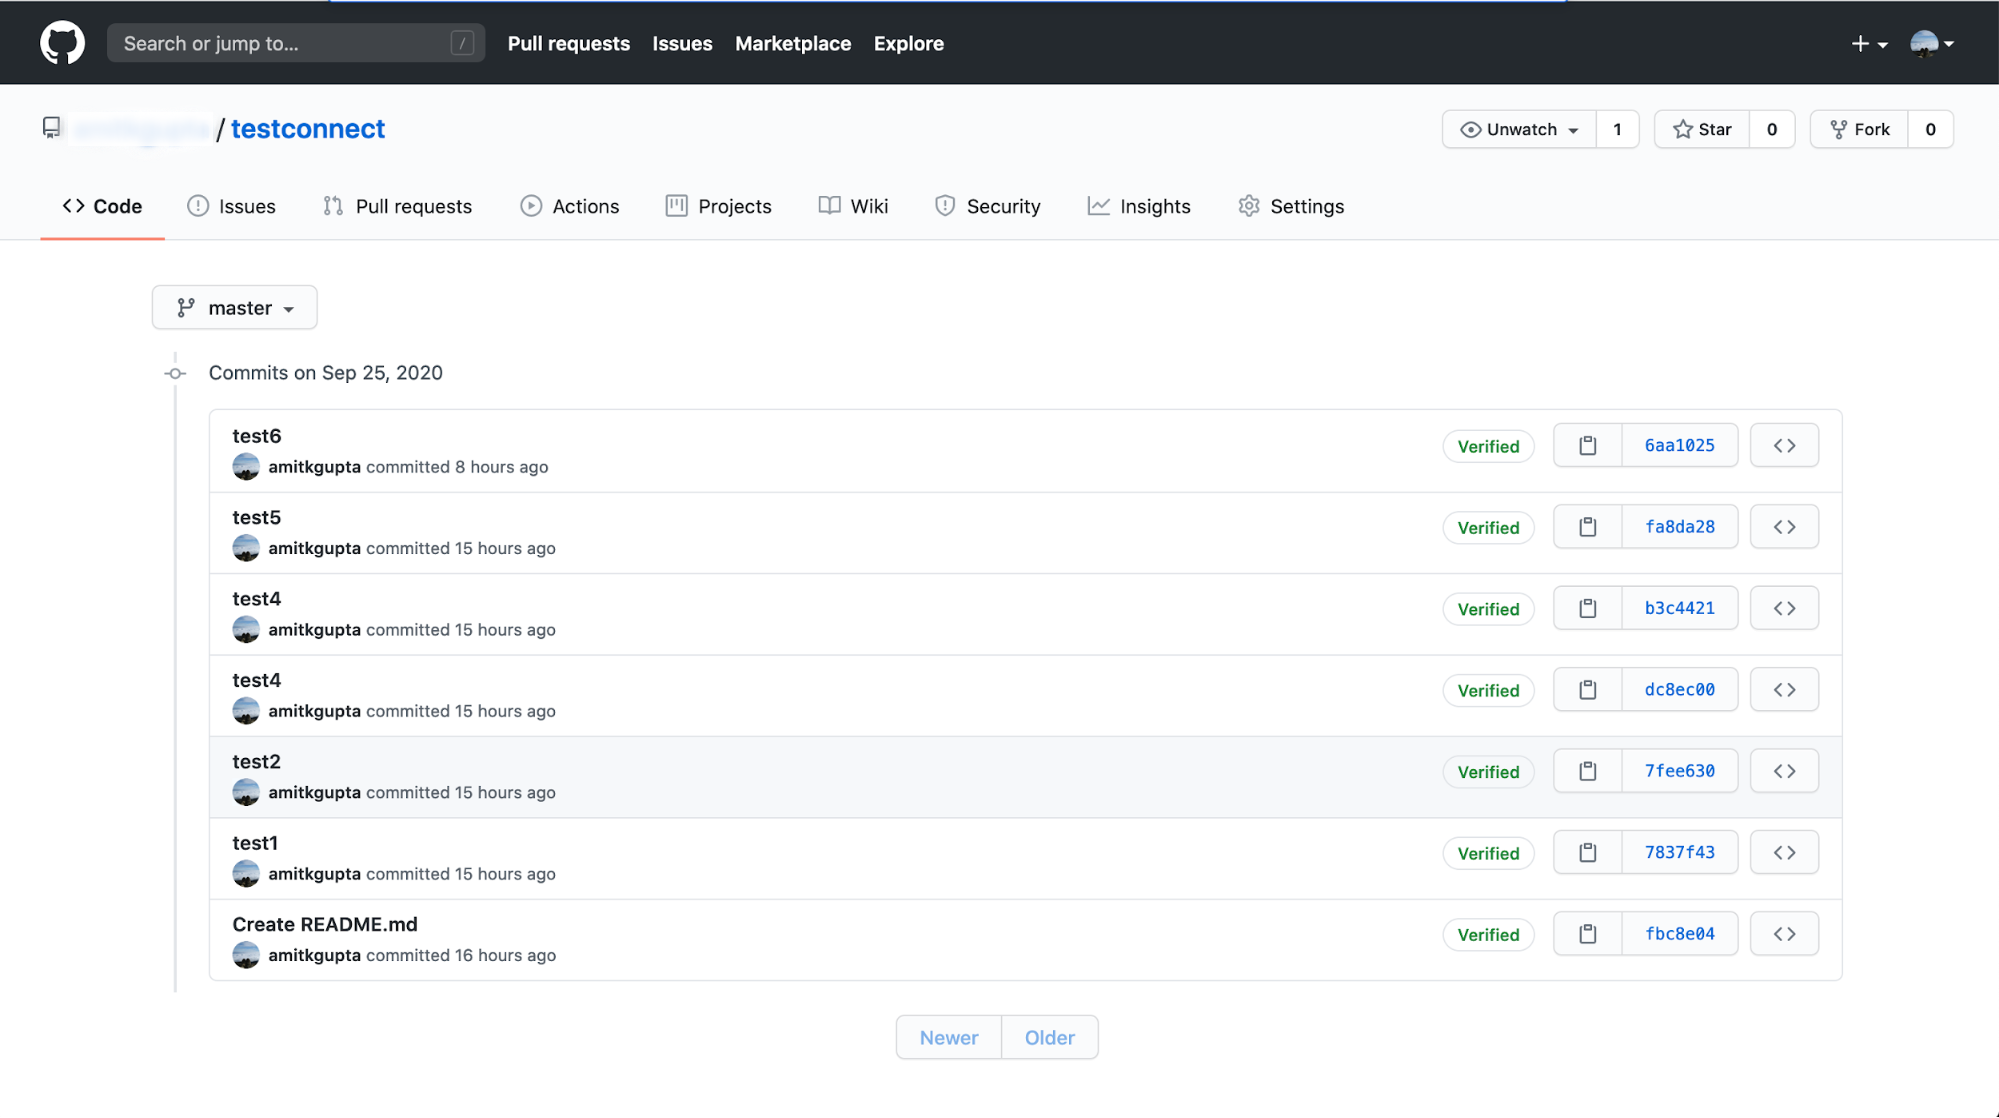
You’ll then be able to see messages streaming in for each commit in Control Center. For example, if you created a commit history like the one pictured above, you might see messages in Control Center like the following:
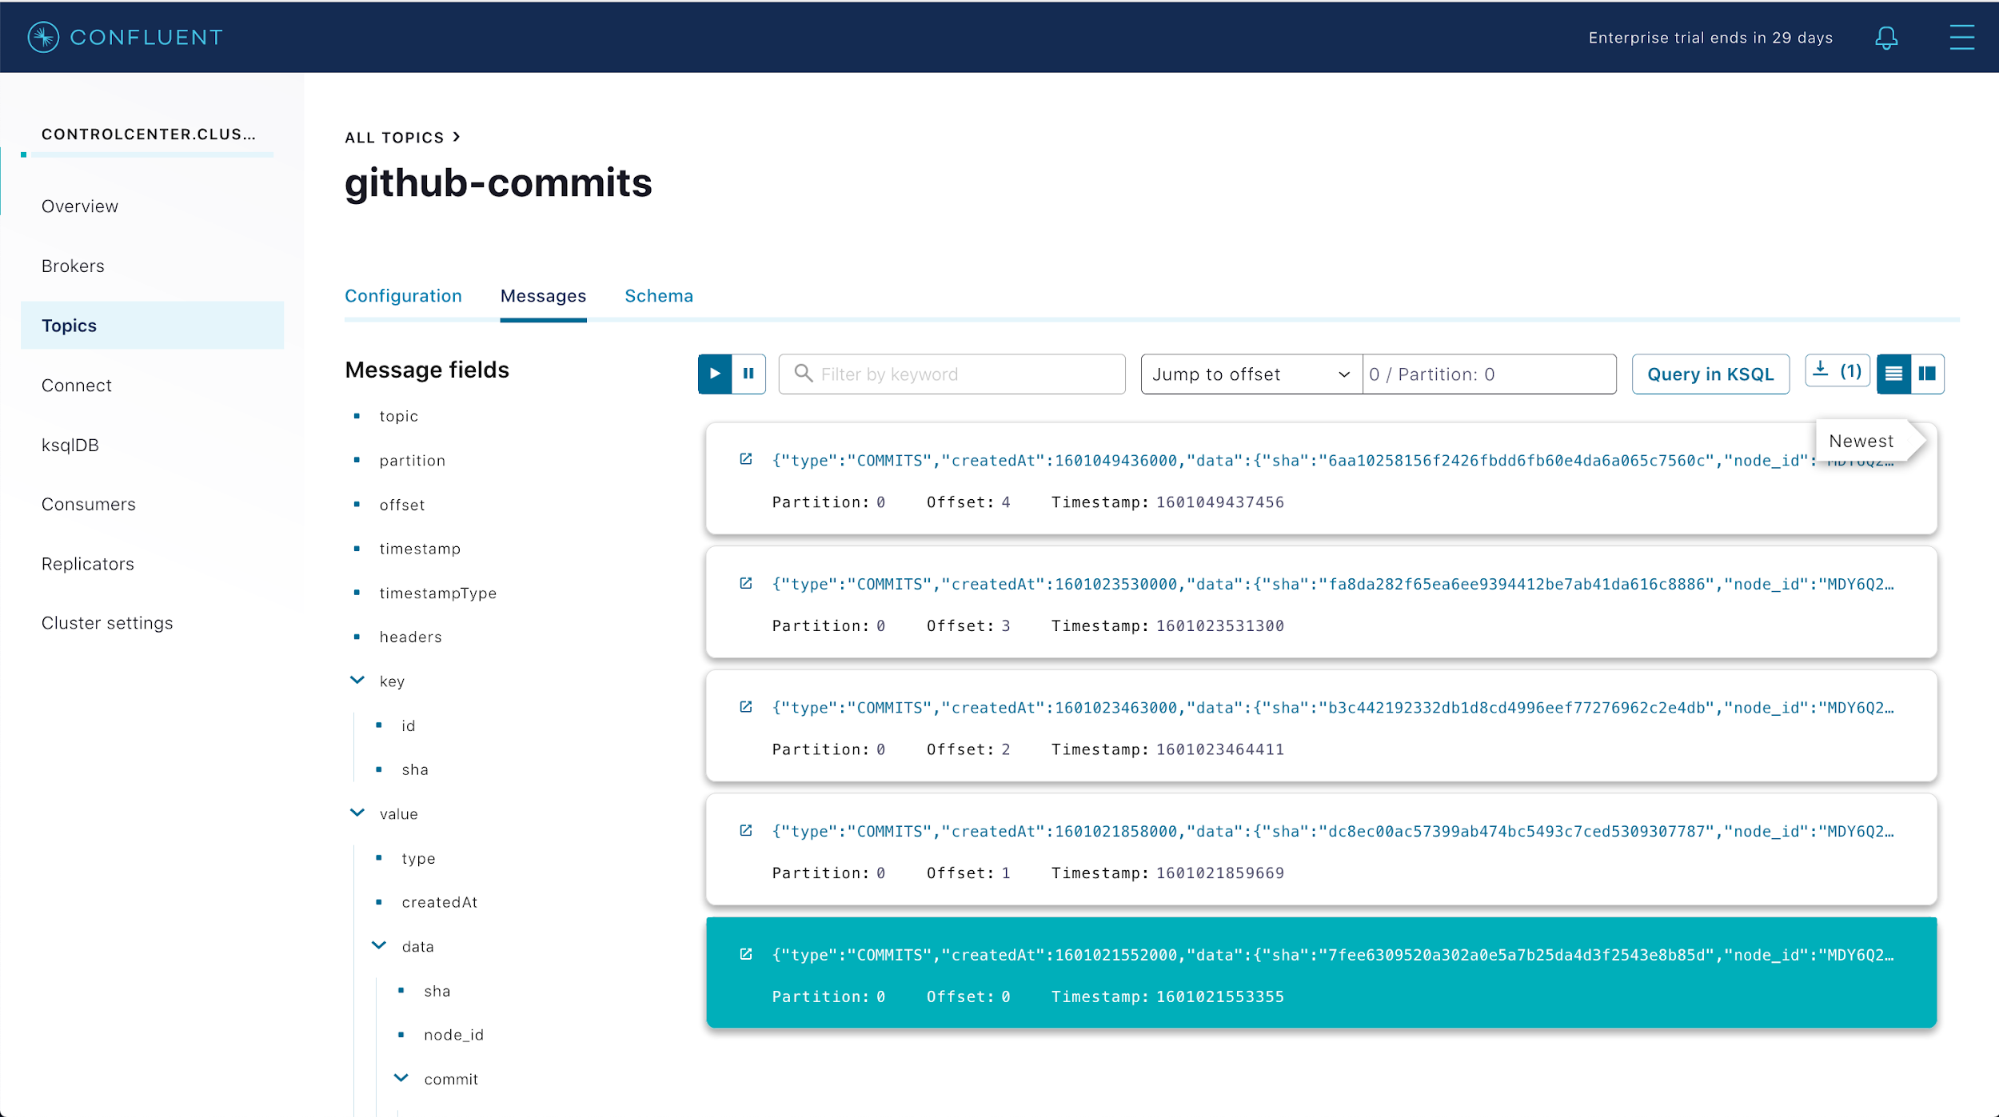
That’s it! Commit messages to the repo are showing up as messages in our topic, and the sensitive credentials needed for Confluent Platform to track the GitHub repo are stored securely only in HashiCorp Vault. The only workload that can access this sensitive credential is the Connect worker, and it only has access to the credential in memory thanks to the integration between HashiCorp Vault, Kubernetes, and Confluent Operator.
Next steps
In the demo above, we saw a powerful pattern for managing secrets applied to the Kafka Connect GitHub Source Connector. This same pattern can be applied to every connector. Furthermore, it can be applied to certain credentials needed as part of the ZooKeeper and Kafka server configurations as well. Try this demo out yourself and learn more about how Confluent Platform secrets can be managed through HashiCorp Vault.
Next, check out how you can apply Kubernetes-native DevOps practices for managing Confluent Platform across multiple environments, from dev/test environments up through production, all with Confluent Operator.
Get started with Confluent, for free
Watch demo: Kafka streaming in 10 minutes
Avez-vous aimé cet article de blog ? Partagez-le !
Abonnez-vous au blog Confluent


Schema Registry Clients in Action
Learn about the bits and bytes of what happens behind the scenes in the Apache Kafka producer and consumer clients when communicating with the Schema Registry and serializing and deserializing messages.

How to Securely Connect Confluent Cloud with Services on Amazon Web Services (AWS), Azure, and Google Cloud Platform (GCP)
The rise of fully managed cloud services fundamentally changed the technology landscape and introduced benefits like increased flexibility, accelerated deployment, and reduced downtime. Confluent offers a portfolio of fully managed...