Fast, Frictionless, and Secure: Explore our 120+ Connectors Portfolio | Join Webinar!
4 Steps to Creating Apache Kafka Connectors with the Kafka Connect API
Get started with Confluent, for free
Watch demo: Kafka streaming in 10 minutes
If you’ve worked with the Apache Kafka® and Confluent ecosystem before, chances are you’ve used a Kafka Connect connector to stream data into Kafka or stream data out of it. While there is an ever-growing list of connectors available—whether Confluent or community supported⏤you still might find yourself needing to integrate with a technology for which no connectors exist. Don’t despair, my friend! You can create a connector with the Kafka Connect API, which provides an easy way to create fault-tolerant Kafka producers or consumers for streaming data in and out of Kafka.
This article will cover the basic concepts and architecture of the Kafka Connect framework. Then, we’ll dive into four steps for being well on your way toward developing a Kafka connector. Our discussion will largely focus on source connectors, but many of the concepts covered will apply to sink connectors as well. We’ll also discuss next steps for learning more about Kafka Connect development best practices, as well as harnessing Confluent’s help in getting your connector verified and published on the Confluent Hub.
What is Kafka Connect?
Kafka Connect specializes in copying data into and out of Kafka. At a high level, a connector is a job that manages tasks and their configuration. Under the covers, Kafka Connect creates fault-tolerant Kafka producers and consumers, tracking the offsets for the Kafka records they’ve written or read.
Beyond that, Kafka connectors provide a number of powerful features. They can be easily configured to route unprocessable or invalid messages to a dead letter queue, apply Single Message Transforms before a message is written to Kafka by a source connector or before it is consumed from Kafka by a sink connector, integrate with Confluent Schema Registry for automatic schema registration and management, and convert data into types such as Avro or JSON. By leveraging existing connectors⏤for example, those listed on the Confluent Hub⏤developers can quickly create fault-tolerant data pipelines that reliably stream data from an external source into records in Kafka topics or from Kafka topics into an external sink, all with mere configuration and no code!
Each connector instance can break down its job into multiple tasks, thereby parallelizing the work of copying data and providing scalability. When a connector instance starts up a task, it passes along the configuration properties that each task will need. The task stores this configuration—as well as the status and the latest offsets for the records it has produced or consumed—externally in Kafka topics. Since the task does not store any state, tasks can be stopped, started, or restarted at any time. Newly started tasks will simply pick up the latest offsets from Kafka and continue on their merry way.
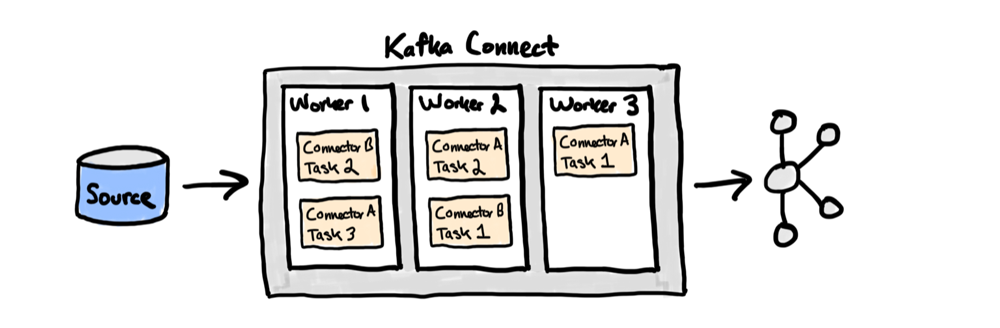
Kafka connectors can be run in either standalone or distributed mode. In standalone mode, Kafka Connect runs on a single worker⏤that is, a running JVM process that executes the connector and its tasks. In distributed mode, connectors and their tasks are balanced across multiple workers. The general recommendation is to run Kafka Connect in distributed mode, as standalone mode does not provide fault tolerance.
To start a connector in distributed mode, send a POST request to the Kafka Connect REST API, as described in the documentation. This request triggers Kafka Connect to automatically schedule the execution of the connectors and tasks across multiple workers. In the instance that a worker goes down or is added to the group, the workers will automatically coordinate to rebalance the connectors and tasks amongst themselves.
Getting started with Kafka connectors
Kafka Connect is part of Apache Kafka but in it of itself doesn’t include connectors. You can download connectors separately, or you can download the Confluent Platform, which includes both Apache Kafka and a number of connectors, such as JDBC, Elasticsearch, HDFS, S3, and JMS. Starting these connectors is as easy as submitting a POST request to the Kafka Connect REST API with the required configuration properties. For integration with other sources or sinks, you are likely to find a connector that suits your needs on the Confluent Hub.
In case a Kafka connector does not already exist for the technology you want to integrate with, this article will guide you through the first steps toward developing a Kafka connector that does. As we will see, creating a connector is just a matter of implementing several Kafka Connect interfaces. The Kafka Connect framework takes care of the rest so that you can focus on implementing the logic specific to your integration, without getting bogged down by boilerplate code and operational complexities.
Interested in creating a connector? Kafka Connect API to the rescue!
The Kafka Connect API allows you to plug into the power of the Kafka Connect framework by implementing several of the interfaces and abstract classes it provides. A basic source connector, for example, will need to provide extensions of the following three classes: SourceConnector, SourceTask, and AbstractConfig. Together, these define the configuration and runtime behavior of your custom Kafka connector. In the following sections, we’ll cover the essential components that will get you up and running with your new Kafka connector.
Step 1: Define your configuration properties
When connectors are started, they pick up configuration properties that allow the connector and its tasks to communicate with an external sink or source, set the maximum number of parallel tasks, specify the Kafka topic to stream data to or from, and provide any other custom information that may be needed for the connector to do its job.
Configuration values are first provided to the connector as String instances. See, for example, the method signature for Connector#start:
public abstract class Connector implements Versioned {
[...]
	public abstract void start(Map<String, String> props);
[...]
}
Once passed to the connector on startup, the provided properties can be parsed into more appropriate types by passing them to an instance of the AbstractConfig class provided by the Kafka Connect API. The first step in developing your connector is to create a class that extends AbstractConfig, which allows you to define types along with default values, validations, recommenders, and documentation for each property.
Suppose, for example, you are writing a source connector to stream data from a cloud storage provider. Among the configuration properties needed to start such a connector, you may want to include the Kafka topic name to produce records to, say, a whitelist of key prefixes for the objects to import. Here is an example configuration class you might write:
public class CloudStorageSourceConnectorConfig extends AbstractConfig {

    public CloudStorageSourceConnectorConfig(Map originals) {
        super(configDef(), originals);
    }

    protected static ConfigDef configDef() {
        return new ConfigDef()
                .define("bucket",
                        ConfigDef.Type.STRING,
                        ConfigDef.Importance.HIGH,
                        "Name of the bucket to import objects from")
                .define("prefix.whitelist",
                        ConfigDef.Type.LIST,
                        ConfigDef.Importance.HIGH,
                        "Whitelist of object key prefixes")
                .define("topic",
                        ConfigDef.Type.STRING,
                        ConfigDef.Importance.HIGH,
                        "Name of Kafka topic to produce to");
    }
}
Note that in our example, we define the prefix.whitelist property to be of List type. When we pass the map of original values to the parent AbstractConfig class, the configuration properties will be parsed into their appropriate types according to the configuration definition. As a result, we can later grab the prefix.whitelist value as a List from our connector’s configuration instance, even though the value was originally provided to the connector as a comma-delimited String, e.g., “path/to/file/1,path/to/file/2,path/to/file/3”.
At a minimum, each configuration definition will require a configuration key, the configuration value type, a level of importance, a brief description documenting the configuration property, and in most cases, a default value. However, you should also take advantage of more advanced features, such as the ability to define groups of configs, pass in validators that will be invoked on startup, provide recommenders that suggest configuration values to the user, and specify the order of configs or a dependency on other configs. In fact, it’s best practice to include validators, recommenders, groups, and defaults where possible to ensure that your user gets immediate feedback upon misconfiguration and can easily understand the available configuration options and their logical groupings.
Having made our configuration class, we can now turn our attention to starting the connector. Here’s an example implementation of start in our CloudStorageSourceConnector class:
public class CloudStorageSourceConnector extends SourceConnector {

    private CloudStorageSourceConnectorConfig connectorConfig;

    @Override
    public void start(Map<String, String> props) {
        this.connectorConfig = new CloudStorageConnectorConfig(props);
        this.configProps = Collections.unmodifiableMap(props);
    }

   [...]
}
When the connector starts, a new instance of our custom configuration class is created, which provides a configuration definition to the Kafka Connect framework. If any of the required configurations are missing or provided as an incorrect type, validators will automatically cause startup failures with an appropriate error message.
Step 2: Pass configuration properties to tasks
The next step is to implement the Connector#taskConfigs method, which returns a list of maps containing the configuration properties each task will use to stream data into or out of Kafka:
public abstract class Connector implements Versioned {
[...]
	public abstract List<Map<String, String>> taskConfigs(int maxTasks);
[...]
}
The method accepts an int value for the maximum number of tasks to run in parallel and is pulled from the tasks.max configuration property that is provided on startup.
Each map in the List returned by taskConfigs corresponds with the configuration properties used by a task. Depending on the kind of work your connector is doing, it may make sense for all tasks to receive the same config properties, or you may want different task instances to get different properties. For example, suppose you want to divide the number of object key prefixes to stream data evenly across the number of running task instances. If given a whitelist with three key prefixes, provide only one key prefix to each of the three task instances to import objects for. Each task can then focus on streaming data for objects whose keys have a particular prefix, splitting up the work into parallel tasks.
There are several considerations to keep in mind when implementing taskConfig. First, the tasks.max configuration property is provided to allow users the ability to limit the number of tasks to be run in parallel. It provides the upper limit of the size of the list returned by taskConfig. Second, the size of the returned list will determine how many tasks start. With a database connector, for example, you might want each task to pull data from a single table. If your database is relatively simple and only has two tables, then you could have your taskConfigs return a list of size two, even if the maxTasks value passed into the method is greater than two. On the other hand, if you have six tables but a maxTasks value of two, then you will need each task to pull from three tables.
To help perform this grouping, the Kafka Connect API provides the utility method ConnectorUtils#groupPartitions, which splits a target list of elements into a desired number of groups. Similarly, in our cloud storage example, we can implement taskConfig to get the whitelist of object key prefixes, divide that list based on the value of maxTasks or the size of the prefix whitelist, and return a list of configs, with each config containing different object key prefixes for the task to stream objects for. Below is an example implementation:
    @Override
    public List<Map<String, String>> taskConfigs(int maxTasks) {
        List prefixes = connectorConfig.getList(PREFIX_WHITELIST_CONFIG);
        int numGroups = Math.min(prefixes.size(), maxTasks);
        List<List> groupedPrefixes = ConnectorUtils.groupPartitions(prefixes, numGroups);
        List<Map<String, String>> taskConfigs = new ArrayList<>(groupedPrefixes.size());

        for (List taskPrefixes : groupedPrefixes) {
            Map<String, String> taskProps = new HashMap<>(configProps);
            taskProps.put(TASK_PREFIXES, String.join(",", taskPrefixes));
            taskConfigs.add(taskProps);
        }

        return taskConfigs;
    }
On startup, the Kafka Connect framework will pass each configuration map contained in the list returned by taskConfigs to a task.
The connector will also need additional methods implemented, but the implementation of those methods are relatively straightforward. Connector#stop gives you an opportunity to close any resources that may be open before the connector is stopped. Although simple in what it needs to accomplish, it’s important for Connector#stop not to block the shutdown process for too long. Connector#taskClass returns the class name of your custom task. Connector#config should return the ConfigDef defined in your custom configuration class. Lastly, Connector#version must return the connector’s version.
Step 3: Task polling
As with the Connector class, Task includes abstract methods for start, stop, and version. Most of the logic for streaming data into Kafka, however, will occur in the poll method, which is continually called by the Kafka Connect framework for each task:
public abstract List poll() throws InterruptedException;
As we can see, the poll method returns a list of SourceRecord instances. A source record is used primarily to store the headers, key, and value of a Connect record, but it also stores metadata such as the source partition and source offset.
Source partitions and source offsets are simply a Map that can be used to keep track of the source data that has already been copied to Kafka. In most cases, the source partition reflects the task configuration that allows the task to focus on importing specific groups of data.
For example, our cloud storage source connector imports objects based on a whitelist of object key prefixes. In the implementation for Task#poll, the imported object is wrapped in a SourceRecord that contains a source partition, which is a Map that has information about where the record came from. The source partition could store the object key prefix that the task used to import the object. SourceRecord instances also contain a source offset, which is used to identify the object that was imported from the source. The source offset could contain identification information about the object in the bucket⏤the full object key name, version ID, last modified timestamp, and other such fields. The source partition and offset can later be used by the task to track the objects that have already been imported.
The Kafka Connect framework automatically commits offsets to the topic configured by the offset.storage.topic property. When a Connect worker or task is restarted, it can use the task’s SourceTaskContext to obtain an OffsetStorageReader, which has an offset method for getting the latest offset recorded for a given source partition. The task can then use the offset and partition information to resume importing data from the source without duplicating or skipping records.
Step 4: Create a monitoring thread
The Kafka Connect REST API includes an endpoint for modifying a Connector’s configuration. Submit a PUT request as described in the documentation, and your connectors and tasks will rebalance across the available workers to ensure that the configuration changes do not prompt an uneven workload across nodes.
However, you may want to design your connector to be able to pick up changes in the source, pick up new configs, and rebalance the workload across available workers without having to manually submit a request to the Kafka Connect API. Connectors monitoring for changes in the external source that may require reconfiguration and automatically reconfigure to accommodate those changes are called dynamic connectors.
To make your connector dynamic, you will need to create a separate thread for monitoring changes and create a new instance of the monitoring thread upon connector startup:
public class MySourceConnector extends SourceConnector {

    private MonitoringThread monitoringThread;

    @Override
    public void start(Map<String, String> props) {
        [...]
        monitoringThread = new MonitoringThread(context);
    }
    [...]
}
Your source connector will also need to pass its ConnectorContext to the monitoring thread. If the monitor detects changes in the external source, requiring reconfiguration, it will call ConnectorContext#requestTaskReconfiguration to trigger the Kafka Connect framework to update its task configuration.
Since updated configuration often means changes to the input partitions, the Kafka Connect framework also rebalances the workload across the available workers. On startup, the source connector can pass a polling interval property to the monitoring thread that can set a wait time on a CountDownLatch. Here is a sample implementation, which waits a certain number of milliseconds before querying the external source again for changes:
public class MonitoringThread extends Thread {

    [...]
    private final Long pollInterval;

    public MonitoringThread(ConnectorContext context, Long pollInterval) {
        [...]
        this.pollInterval = pollInterval;
    }

    @Override
    public void run() {
        while (shutdownLatch.getCount() > 0) {
            if (sourceHasChanged()) {
                context.requestTaskReconfiguration();
            }

            try {
                shutdownLatch.await(pollInterval, TimeUnit.MILLISECONDS);
            } catch (InterruptedException e) {
                log.warn("MonitoringThread interrupted: ", e);
            }
        }
    }
    [...]
}
Having implemented a monitoring thread that triggers task reconfiguration when the external source has changed, you now have a dynamic Kafka connector!
Next steps
Although further implementation is required to have a fully running connector, we’ve covered the major components you need to start creating a dynamic source connector. To learn more about Kafka Connect development, see the documentation. Also be sure to check out Robin Moffatt’s awesome talk From Zero to Hero with Kafka Connect, which covers how to use Kafka connectors to create a pipeline for streaming data from a database to Kafka and then to Elasticsearch, including a discussion of common issues that may arise and how to resolve them.
If you’re interested in developing or submitting a connector for distribution on the Confluent Hub, the Confluent Verified Integrations Program is a fantastic resource for getting guidance on developing and verifying your connector. There, you’ll find a verification guide and checklist that contains connector development best practices as well as the connector features and behaviors required to achieve a Confluent-verified Gold status. The verification guide is another great resource for learning more about Kafka Connect development.
Get started with Confluent, for free
Watch demo: Kafka streaming in 10 minutes
Avez-vous aimé cet article de blog ? Partagez-le !
Abonnez-vous au blog Confluent


Kafka-docker-composer: A Simple Tool to Create a docker-compose.yml File for Failover Testing
The Kafka-Docker-composer is a simple tool to create a docker-compose.yml file for failover testing, to understand cluster settings like Kraft, and for the development of applications and connectors.


How to Process GitHub Data with Kafka Streams
Learn how to track events in a large codebase, GitHub in this example, using Apache Kafka and Kafka Streams.